人工智能实战_团队作业_第一次
| 项目 | 内容 |
|---|---|
| 课程 | 人工智能实战2019 |
| 作业要求 | AI2019课程第四次作业(团队) |
| 团队成员 | 李大,许骏鹏,陈泽寅,邹镇洪,宋知遇,蔺立萱 |
| 本次作业作用 | 熟悉mini_batch的实现、作用 |
| 参考文献 | 谷歌CNN教程,tensorflow CNN教程, kivy doc ,kivy画板教程 |
组队名称: 人工智能小分队
NABCD
- N(Need,需求)
手写体识别是经典计算机视觉项目,旨在最基本的字符类型(数字)上测试机器视觉算法的实用性。本项目通过编写一个交互式的手写数字识别小软件,可以帮助同学们练习动手实践一个小型AI demo,锻炼代码编写能力、团队编程能力和感受基本的机器视觉算法。
但当前手写数字识别早已达到非常高的水准,进而衍生出对于更加复杂的字符和字符组合的识别的需求,比如连续输入、复杂字符识别、表达式识别等,其中数学算式识别被认为是一个基础但具有代表性的拓展,可以帮助人们简答而快捷的输入数学算式,而不必通过繁琐的Math语言编码。其重点应用在于论文编写中,是科研人员的重要助手。当前已经存在的竞品有Mathpix(图像转Math代码)、Word公式编辑器(手写输入字符)等,但鲜有单次输入完整算式的程序。这样的情况一方面说明了这类软件的需求,另一方面说明了开发的必要性。
- A(Approach,做法)
搭建手写数字识别软件。
- 模型实现
- 我们使用tensorflow实现了一个CNN进行数字识别
- 卷积层相比于由全连接层在构成神经网络时通过参数共享使网络不需要图片中识别目标的相对位置,减少了参数,提高训练效率,是使用神经网络做图片识别时常用的网络架构
- CNN相关教程网上很多,我们仅简单介绍一下
- CNN将二维图像通过卷积和pooling逐渐展成一维向量,一维向量再送进全连接层做分类最终输出每个数字对应的识别概率
- 卷积核是m*m的矩阵
- stride是其扫描时的步长
- padding是扫描到边缘时是否向外补全的设定
- relu函数是一个激活函数,用于加速收敛,和sigmoid类似
- AdamOptimizer是一个常用的步长调整梯度下降优化器,随着迭代次数的增加步长减小,以达到更精细的权值调整
- 我们使用Mnist数据集进行训练
扩展软件功能,支持连续输入连续识别,支持算式识别。
- B(Benefit,好处)
可以帮助人们简答而快捷的输入数学算式,而不必通过繁琐的Math语言编码。其重点应用在于论文编写中,是科研人员的重要助手。
- C(Competition,竞争)
目前主要有两类竞品:图像转公式、手写公式
- 图像转公式:以Mathpix为代表,这列工具的主要功能在于将现有文件上的公式以截图的形式存储,再从图像中识别公式并转为Math代码,适用于以代码编辑公式的场景,便于用户直接利用其它位置获得的公式,但对于自建公式的编辑无效用。
- 手写公式:以微软的Math Input Panel为代表,这类工具的主要功能在于获取用户在输入面板上绘制的公式图形,再从图形中识别公式并转为公式类型文本(不是代码),适用于比较复杂的公式编辑、自建公式的编辑和无法使用代码编辑公式的情景,缺点是识别效率较低,容易误识别。
- 我们的主要竞品是第二类。
- D(Delivery, 交付)
初期:实现单个数字的识别。
中期:实现连续输入字符的识别。
后期:扩展识别字符的类型(包含基本的算式字符),实现不太复杂的算式识别。
团队成员&&分工
- 陈泽寅:模型的建立以及算法实现、文档撰写
- 李大: 算法的实现以及参数的调节、文档撰写
- 邹镇洪:算法的实现以及参数的调节、需求分析
- 宋知遇:神经网络的搭建数据的搜集
- 蔺立萱:神经网络算法以及界面设计
- 许骏鹏:数据搜集以及数据预处理
项目时间预估以及项目期望
- 希望在期末结束之前,我们能够做出类似\(a/b+c/d\)这类的手写算式的计算实现。
模型实现
- 我们使用tensorflow实现了一个CNN进行数字识别
- 卷积层相比于由全连接层在构成神经网络时通过参数共享使网络不需要图片中识别目标的相对位置,减少了参数,提高训练效率,是使用神经网络做图片识别时常用的网络架构
- CNN相关教程网上很多,我们仅简单介绍一下
- CNN将二维图像通过卷积和pooling逐渐展成一维向量,一维向量再送进全连接层做分类最终输出每个数字对应的识别概率
- 卷积核是m*m的矩阵
- stride是其扫描时的步长
- padding是扫描到边缘时是否向外补全的设定
- relu函数是一个激活函数,用于加速收敛,和sigmoid类似
- AdamOptimizer是一个常用的步长调整梯度下降优化器,随着迭代次数的增加步长减小,以达到更精细的权值调整
- 我们使用Mnist数据集进行训练
# coding: utf-8
import tensorflow as tf

def conv_net(input_x_dict, reuse, is_training):
    with tf.variable_scope('ConvNet', reuse=reuse):
        # TF Estimator input is a dict, in case of multiple inputs
        # 为了适应有多个输入变量的情况,TF Estimator要求输入是一个字典
        input_x = input_x_dict['images']

        # Input layer 输入层 [28*28*1]
        input_x_images = tf.reshape(input_x, [-1, 28, 28, 1])
        # The reason why the first dimension should be -1, is that we don't know the size of input,

        conv1 = tf.layers.conv2d(
            inputs=input_x_images,
            filters=32,
            kernel_size=[5, 5],
            strides=1,
            padding='same',
            activation=tf.nn.relu
        )

        pool1 = tf.layers.max_pooling2d(
            inputs=conv1,
            pool_size=[2, 2],
            strides=2
        )

        conv2 = tf.layers.conv2d(
            inputs=pool1,
            filters=64,
            kernel_size=[5, 5],
            strides=1,
            padding='same',
            activation=tf.nn.relu
        )

        pool2 = tf.layers.max_pooling2d(
            inputs=conv2,
            pool_size=[2, 2],
            strides=2
        )

        flat = tf.reshape(pool2, [-1, 7 * 7 * 64])

        dense = tf.layers.dense(
            inputs=flat,
            units=1024,
            activation=tf.nn.relu
        )

        # Dropout层
        # tf.layers.dropout
        # inputs 张量
        # rate 丢弃率
        # training 是否是在训练的时候丢弃
        dropout = tf.layers.dropout(
            inputs=dense,
            rate=0.5,
            training=is_training
        )

        # Output Layer, activation is not needed (actually a dense layer)
        # 输出层,不用激活函数(本质就是一个全连接层)
        logits = tf.layers.dense(
            inputs=dropout,
            units=10
        )
        # Output size 输出形状 [?,10]

        return logits


def model_fn(features, labels, mode):
    # 因为Dropout对于训练和测试/预测有不同的行为,我们需要建立两个独立的网络,但它们共享相同的权重
    logits_train = conv_net(features, reuse=False, is_training=True)  # Net for training  对于训练
    logits_test = conv_net(features, reuse=True, is_training=False)  # Net for evaluation and prediction  对于评估和预测

    # Predictions  预测
    pred_classes = tf.argmax(logits_test, axis=1)
    pred_probas = tf.nn.softmax(logits_test)

    # If prediction mode, early return  如果是预测模式,则提前退出
    if mode == tf.estimator.ModeKeys.PREDICT:
        predictions = {
            'class_ids': pred_classes,
            'probabilities': pred_probas
        }
        return tf.estimator.EstimatorSpec(mode, predictions=predictions)

    # Define loss  定义损失函数
    loss = tf.losses.softmax_cross_entropy(onehot_labels=labels, logits=logits_train)

    if mode == tf.estimator.ModeKeys.TRAIN:
        learning_rate = 0.001   # 学习速率
        optimizer = tf.train.AdamOptimizer(learning_rate=learning_rate)
        train_op = optimizer.minimize(loss, global_step=tf.train.get_global_step())
        return tf.estimator.EstimatorSpec(mode, loss=loss, train_op=train_op)

    # Calculate accuracy  计算准确率
    acc_op = tf.metrics.accuracy(labels=tf.argmax(labels, axis=1), predictions=pred_classes)
    # Calculate recall  计算召回率
    rec_op = tf.metrics.recall(labels=tf.argmax(labels, axis=1), predictions=pred_classes)
    eval_metrics = {
        'accuracy': acc_op,
        'recall': rec_op
    }

    # For tensorboard display  用于tensorboard显示
    tf.summary.scalar('accuracy', acc_op[1])
    tf.summary.scalar('recall', rec_op[1])

    # Evaluate the model  评估模型
    if mode == tf.estimator.ModeKeys.EVAL:
        # TF Estimators requires to return a EstimatorSpec, that specify
        # the different ops for training, evaluating, ...
        estim_specs = tf.estimator.EstimatorSpec(
            mode=mode,
            loss=loss,
            eval_metric_ops=eval_metrics
        )
        return estim_specs
- trainer.py
# coding: utf-8
import tensorflow as tf
import CNN
import os
import shutil
from tensorflow.examples.tutorials.mnist import input_data

# Set the hyper params  设置超参数
num_step = 2000  # number of the training step  训练迭代数
train_batch_size = 50 # batch size for training  训练的batch大小
test_batch_size = 50 # batch size for test  测试所有的batch大小

# If a trained model exists, delete it and train a new model from the beginning
# 如果有已经训练好的模型存在,删除它,从头开始训练
if os.path.exists('saved_model'):
    shutil.rmtree('saved_model')

# Display the tensorflow log
# 显示tensorflow日志
tf.logging.set_verbosity(tf.logging.INFO)

# Get data from MNIST dataset
# 从MNIST数据集中获取数据
mnist = input_data.read_data_sets('mnist_data/', one_hot=True)
train_x = mnist.train.images
train_y = mnist.train.labels
test_x = mnist.test.images
test_y = mnist.test.labels

# =============Training  训练模型=============
# Build the Estimator  创建一个tensorflow estimator
model = tf.estimator.Estimator(CNN.model_fn, model_dir=r'saved_model/')

# Define the input function for training  # 定义训练的数据输入函数
train_input_fn = tf.estimator.inputs.numpy_input_fn(
    x={'images':train_x}, y=train_y,
    batch_size=train_batch_size, num_epochs=None, shuffle=True
)

# Begin the training  开始训练
model.train(train_input_fn, steps=num_step)

# =============Evaluate  测试评估模型=============
# Define the input function for evaluating  # 定义测试的数据输入函数
test_input_fn = tf.estimator.inputs.numpy_input_fn(
    x={'images':test_x}, y=test_y,
    batch_size=test_batch_size, shuffle=False
)

# Use the Estimator 'evaluate' method  开始测试
model.evaluate(test_input_fn)
- predictor.py
class CNNPredictor:
    # Initialize the saved trained CNN model
    # 初始化保存的训练好的CNN模型
    def __init__(self):
        self.model = tf.estimator.Estimator(CNN.model_fn, model_dir=r'saved_model/')
        print('获取模型')

    # Process the image
    # 处理图片
    def process_img(self, filepath):
        img = Image.open(filepath)  # Open the file  打开文件
        img = img.resize((28, 28))
        img = img.convert('L')  # Transfer the image into a grey image  转换成灰度图
        imgarr = np.array(img, dtype=np.float32)
        imgarr = imgarr.reshape([1, 28*28])/255.0
        return imgarr

    # Do predictions and return the result
    # 进行预测,返回预测结果
    def get_predictions(self, filepath):
        imgarr = self.process_img(filepath)
        predict_input_fn = tf.estimator.inputs.numpy_input_fn(
            x={'images':imgarr}, batch_size=1, shuffle=False
        )
        predictions = list(self.model.predict(predict_input_fn))
        return predictions[0]
界面实现
- 我们使用kivy绘制页面
- 核心画图部分是在convas上跟踪鼠标坐标随着鼠标移动画线
- 涉及on_touch_down(手指触下),on_touch_move(触摸点移动),on_touch_up(手指离开)三个事件
class PaintWidget(Widget):
    color = (254, 254, 254, 1)
    thick = 13

    def __init__(self, root, **kwargs):
        super().__init__(**kwargs)
        self.parent_widget = root

    def on_touch_down(self, touch):
        with self.canvas:
            Color(*self.color, mode='rgba')
            if touch.x > self.width or touch.y < self.parent_widget.height - self.height:
                return
            touch.ud['line'] = Line(points=(touch.x, touch.y), width=self.thick)

    def on_touch_move(self, touch):
        with self.canvas:
            if touch.x > self.width or touch.y < self.parent_widget.height - self.height:
                return
            touch.ud['line'].points += [touch.x, touch.y]

    def on_touch_up(self, touch):
        if touch.x > self.width or touch.y < self.parent_widget.height - self.height:
            return
        self.export_to_png('r.png')
        self.parent.parent.do_predictions()
- 其余的界面绘制逻辑只是简单的kivy使用
- 输入图片被保存为r.png后送入predictor进行识别,结果和概率显示在界面上
class Recognizer(BoxLayout):
    def __init__(self, **kwargs):
        super().__init__(**kwargs)

        self.predictor = CNNPredictor()  # Initialize the CNN model from the trained model  从保存的训练好的模型中初始化CNN模型

        self.number = -1  # Variable to store the predicted number  保存识别的数字的变量

        self.orientation = 'horizontal'  # UI related  UI相关
        self.draw_window()

    # function to declare the components of the application, and add them to the window
    # 声明程序UI组件的函数,并且将它们添加到窗口上
    def draw_window(self):
        # Clear button  清除按钮
        # Painting board  画板
        self.painter = PaintWidget(self, size_hint=(1, 8 / 9))
        # Label for hint text  提示文字标签
        self.hint_label = Label(font_name=CNN_Handwritten_Digit_RecognizerApp.font_name, size_hint=(1, 1 / 45))
        # Label for predicted number  识别数字展示标签
        self.result_label = Label(font_size=200, size_hint=(1, 1 / 3))
        # Label for some info  展示一些信息的标签
        self.info_board = Label(font_size=24, size_hint=(1, 26 / 45))

        # BoxLayout  盒子布局
        first_column = BoxLayout(orientation='vertical', size_hint=(2 / 3, 1))
        second_column = BoxLayout(orientation='vertical', size_hint=(1 / 3, 1))
        # Add widgets to the window  将各个组件加到应用窗口上
        first_column.add_widget(self.painter)
        first_column.add_widget(self.hint_label)
        second_column.add_widget(self.result_label)
        second_column.add_widget(self.info_board)
        second_column.add_widget(self.clear_button)
        self.add_widget(first_column)
        self.add_widget(second_column)

        # motion binding  动作绑定
        # Bind the click of the clear button to the clear_paint function
        # 将清除按钮的点击事件绑定到clear_paint函数上
        self.clear_button.bind(on_release=self.clear_paint)

        self.clear_paint()  # Initialize the state of the app  初始化应用状态

    # Clear the painting board and initialize the state of the app.
    def clear_paint(self, obj=None):
        self.painter.canvas.clear()
        self.number = -1
        self.result_label.text = '^-^'
        self.hint_label.text = 'Please draw a digit on the board~'
        self.info_board.text = 'Info Board'

    # Extract info from the predictions, and display them on the window
    # 从预测结果中提取信息,并展示在窗口上
    def show_info(self, predictions):
        self.number = predictions['class_ids']
        self.result_label.text = str(self.number)
        self.hint_label.text = 'The predicted digit is displayed.'
        probabilities = predictions['probabilities']
        template = '''Probabilities
        0: %.4f%%
        1: %.4f%%
        2: %.4f%%
        3: %.4f%%
        4: %.4f%%
        5: %.4f%%
        6: %.4f%%
        7: %.4f%%
        8: %.4f%%
        9: %.4f%%'''
        self.info_board.text = template % tuple(probabilities * 100.0)

    # Use CNN predictor to do prediction, and call show_info to display the result
    # 使用CNN预测器做预测,并调用show_info函数将结果显示出来
    def do_predictions(self):
        pre = self.predictor.get_predictions('r.png')
        self.show_info(pre)
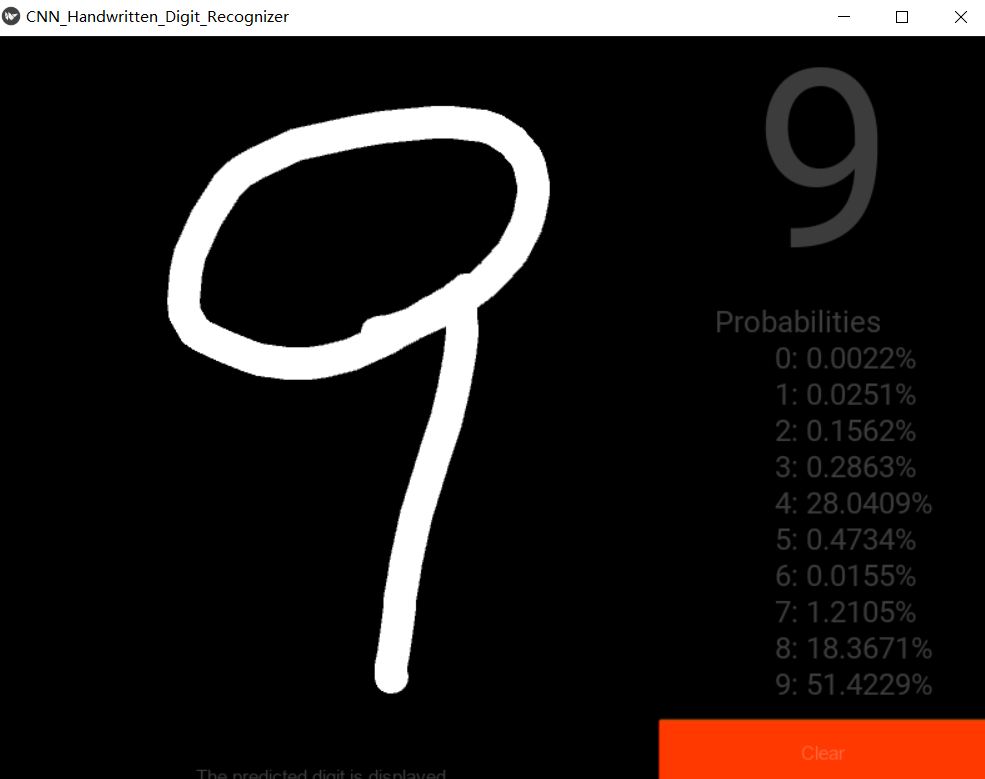
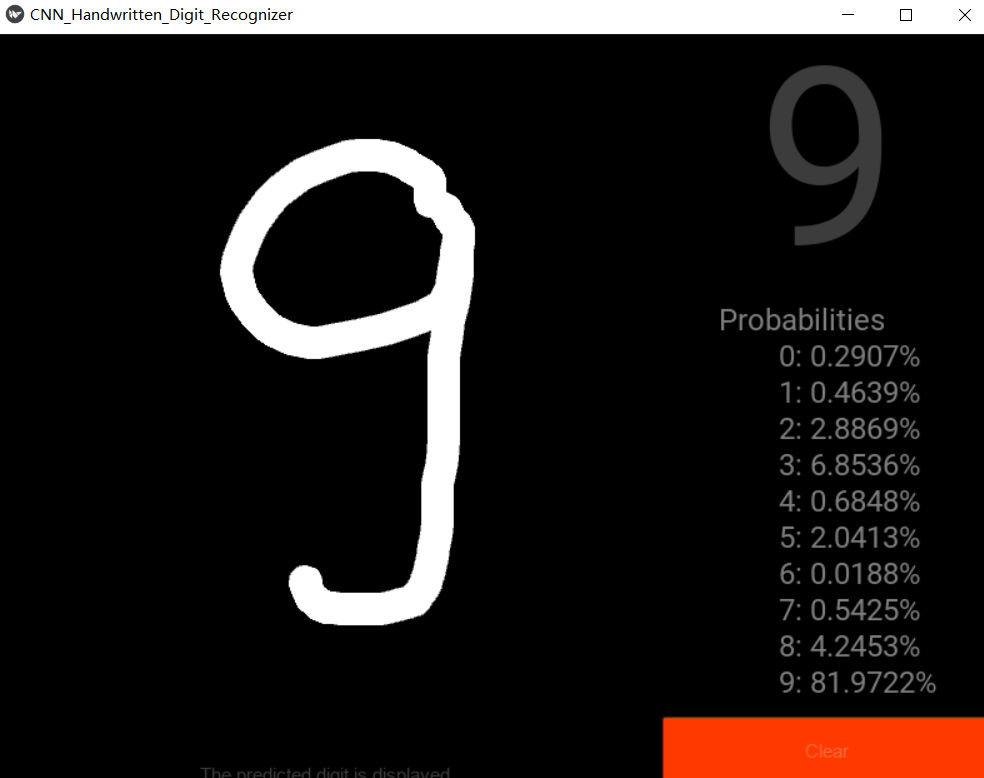
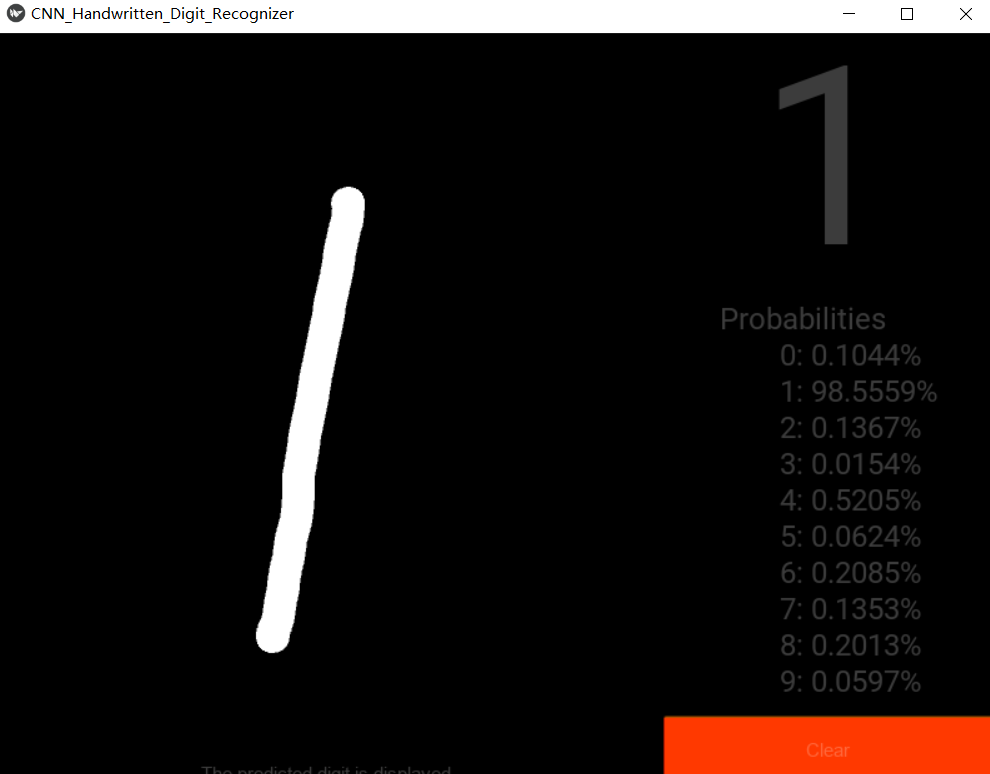
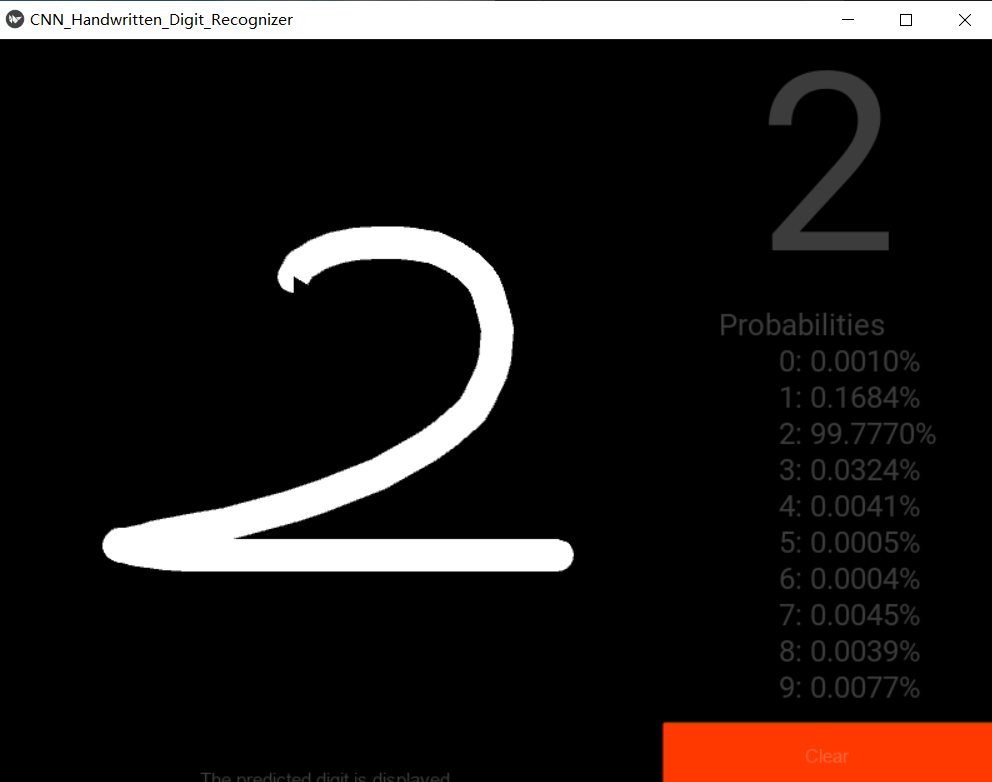
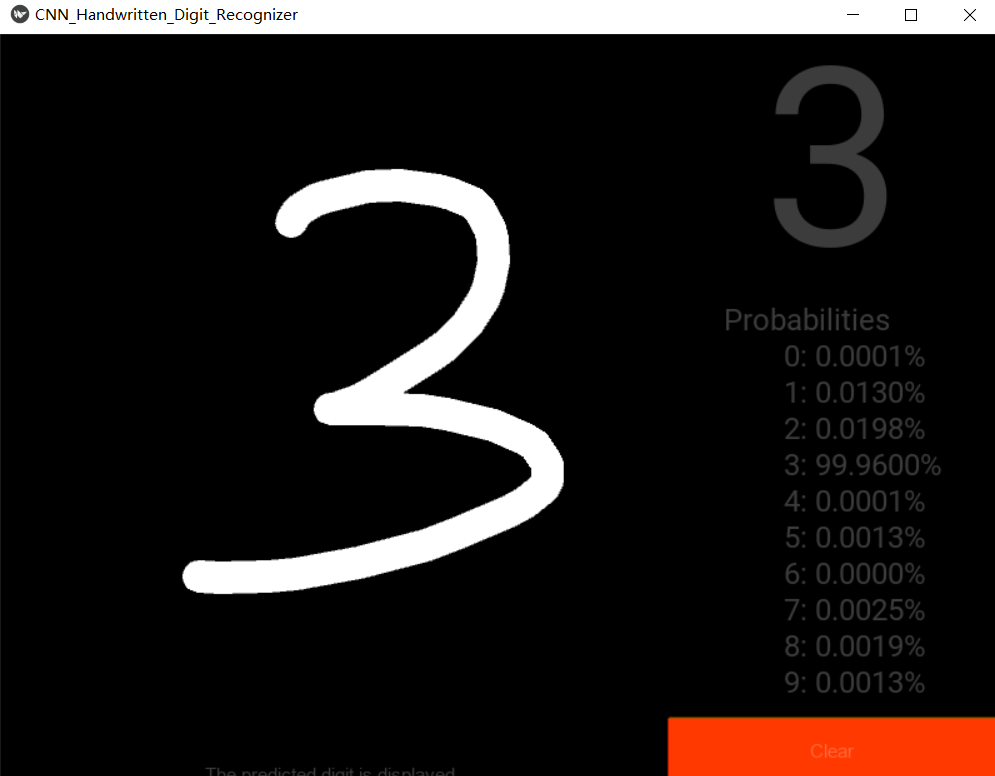
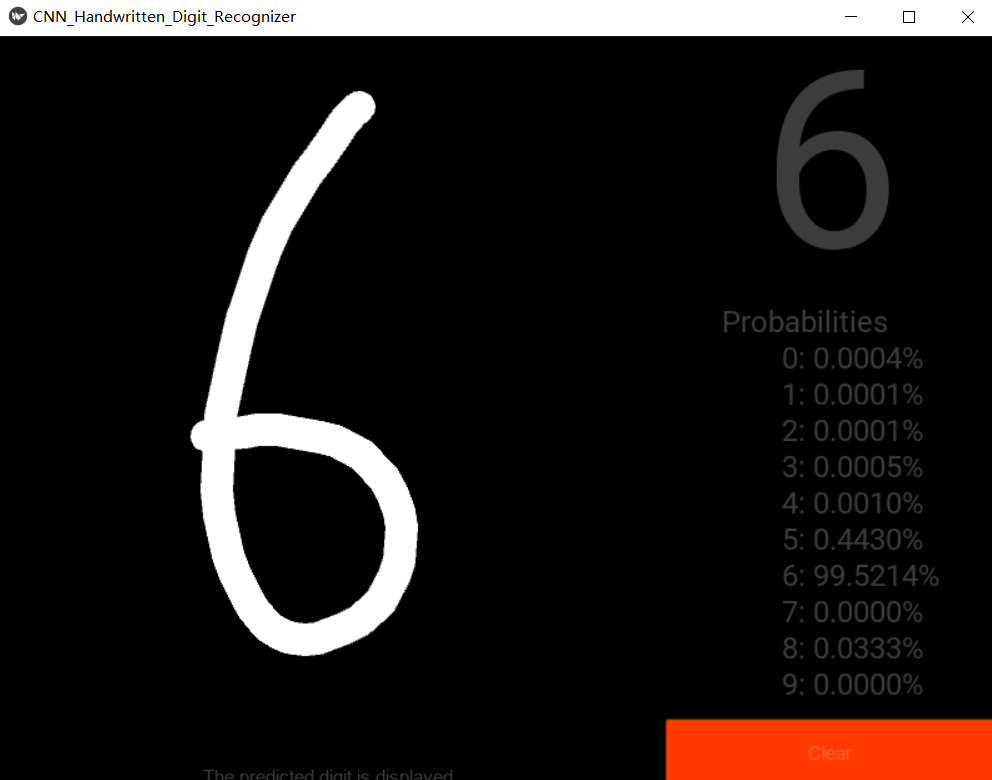
手写界面和识别结果展示
- 0

- 1

- 2

- 3
- 4
-
5

-
6

- 7

- 8

- 9