使用tinc构建full mesh结构的VPN
转自:http://blog.sina.com.cn/s/blog_704836f40102wlmk.html
以前做VPN都是用openvpn来做,当点数多于两个时,需要做星型结构才能让所有点互通。这会产生一个问题,例如同一省的两个城市分公司之间通信,需要绕道核心点,例如北京的VPN服务器,无端增加了非常大的延时。
为了解决这种需求,发现TINC这个VPN软件可以做到。
TINC是开源软件,官网:https://www.tinc-vpn.org
下边举个例子,说明一下full mesh结构的tinc VPN如何配置。
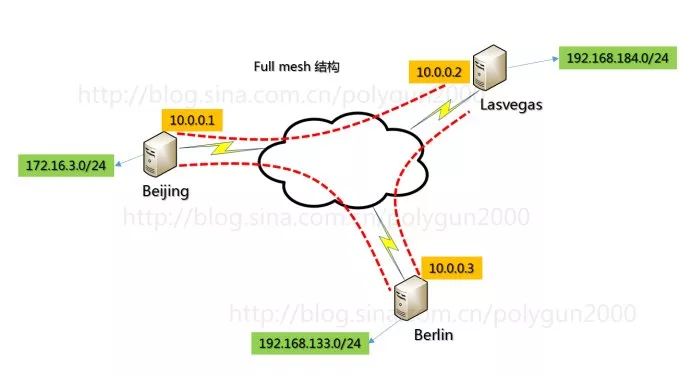
三个点,北京,柏林,拉斯维加斯,后边分别带本地的一个局域网络,要求3个点组成Full mesh结构。
TINC在Centos的EPEL源中有,yum安装即可。netname是给VPN配置起的名字,随需求自己定义。
1.[北京]
Beijing]# yum install tinc
Beijing]# mkdir -p /etc/tinc/netname/hosts
Beijing]# vi /etc/tinc/netname/tinc.conf
==> Name = Beijing
==> AddressFamily = ipv4
==> Interface = tun0
==> ConnectTo = Lasvegas
==> ConnectTo = Berlin
Beijing]# vi /etc/tinc/netname/hosts/Beijing
==> Address = Beijing_public_IP
==> Subnet = 172.16.3.0/24
Beijing]# tincd -n netname -K4096
Beijing]# vi /etc/tinc/netname/tinc-up
==> #!/bin/sh
==> ip link set $INTERFACE up
==> ip addr add 10.0.0.1/24 dev $INTERFACE
==> ip route add 192.168.133.0/24 dev $INTERFACE
==> ip route add 192.168.184.0/24 dev $INTERFACE
Beijing]# vi /etc/tinc/netname/tinc-down
==> #!/bin/sh
==> ip link set $INTERFACE down
Beijing]# chmod 755 /etc/tinc/netname/tinc-*
2.[拉斯维加斯]
Lasvegas]# yum install tinc
Lasvegas]# mkdir -p /etc/tinc/netname/hosts
Lasvegas]# vi /etc/tinc/netname/tinc.conf
==> Name = Lasvegas
==> AddressFamily = ipv4
==> Interface = tun0
==> ConnectTo = Beijing
==> ConnectTo = Berlin
Lasvegas]# vi /etc/tinc/netname/hosts/Lasvegas
==> Address = Lasvegas_public_IP
==> Subnet = 192.168.184.0/24
Lasvegas]# tincd -n netname -K4096
Lasvegas]# vi /etc/tinc/netname/tinc-up
==> #!/bin/sh
==> ip link set $INTERFACE up
==> ip addr add 10.0.0.2/24 dev $INTERFACE
==> ip route add 172.16.3.0/24 dev $INTERFACE
==> ip route add 192.168.184.0/24 dev $INTERFACE
Lasvegas]# vi /etc/tinc/netname/tinc-down
==> #!/bin/sh
==> ip link set $INTERFACE down
Lasvegas]# chmod 755 /etc/tinc/netname/tinc-*
3.[柏林]
# yum install tinc
# mkdir -p /etc/tinc/netname/hosts
# vi /etc/tinc/netname/tinc.conf
==> Name = Berlin
==> AddressFamily = ipv4
==> Interface = tun0
==> ConnectTo = Beijing
==> ConnectTo = Lasvegas
# vi /etc/tinc/netname/hosts/Berlin
==> Address = Berlin_public_IP
==> Subnet = 192.168.133.0/24
# tincd -n netname -K4096
# vi /etc/tinc/netname/tinc-up
==> #!/bin/sh
==> ip link set $INTERFACE up
==> ip addr add 10.0.0.3/24 dev $INTERFACE
==> ip route add 172.16.3.0/24 dev $INTERFACE
==> ip route add 192.168.133.0/24 dev $INTERFACE
# vi /etc/tinc/netname/tinc-down
==> #!/bin/sh
==> ip link set $INTERFACE down
Berlin]# chmod 755 /etc/tinc/netname/tinc-*
4.复制hosts文件到各台服务器
不管你用什么方法,scp也好,sftp也好,最终每台机器的/etc/tinc/netname/hosts目录下都要有所有vpn节点的配置文件,如下所示:
--/etc
--tinc
--netname
--hosts
--Beijing
--Berlin
--Lasvegas
5.在每个vpn节点启动tinc,带有debug参数,可以排除故障
# tincd -n netname -D -d3
6.设为开机自动启动
# systemctl enable tinc@netname
# systemctl start tinc@netname
备注1: 更改监听的端口
如果网络防火墙有低位端口限制,可以让tinc监听在任意你指定的端口上,只需要在hosts文件里Address位置写上指定的端口号即可。
Address = address [port]
备注2: 注意开放防火墙,打开ip_forward
使用默认端口,需要打开防火墙的 UDP 655,TCP 655 进出双向,还要放开tun接口。
# vi /etc/sysctl.d/99-ipforward.conf
net.ipv4.ip_forward = 1
# sysctl -p
# vi /etc/sysconfig/iptables
*filter
:INPUT ACCEPT [0:0]
:FORWARD ACCEPT [0:0]
:OUTPUT ACCEPT [0:0]
-A INPUT -i lo -j ACCEPT
-A INPUT -i tun0 -j ACCEPT
-A INPUT -s 对端IP -p tcp -m tcp --dport 655 -j ACCEPT
-A INPUT -s 对端IP -p udp --dport 655 -j ACCEPT
-A INPUT -m state --state ESTABLISHED,RELATED -j ACCEPT
-A INPUT -p icmp -m icmp --icmp-type 8 -j ACCEPT
-A INPUT -j REJECT --reject-with icmp-host-prohibited
-A FORWARD -j REJECT --reject-with icmp-host-prohibited
COMMIT
# systemctl restart iptables
参考文档:
https://www.digitalocean.com/community/tutorials/how-to-install-tinc-and-set-up-a-basic-vpn-on-ubuntu-14-04
http://ostolc.org/site-to-site-vpn-with-tinc.html
https://2kswiki.wordpress.com/2016/02/05/simple-vpn-network-mesh-with-tinc/
http://blog.hackathon.de/using-tinc-with-iproute2.html
http://www.jianshu.com/p/e030dabafd61
https://florianjacob.de/tinc-vpn-with-ipv6-and-iproute2.html
http://www.rendoumi.com/ling-wai-yi-chong-vpnfang-shi-tinc/
https://silvenga.com/deploy-a-tinc-mesh-vpn-running-tap/
https://wiki.archlinux.org/index.php/Tinc


