【干货】基于GAN实现图像锐化应用(附代码)
【导读】生成对抗网络(GAN)是Ian Goodfellow在2014年在其论文Generative Adversarial Nets中提出来的,可以说是当前最炙手可热的技术了。本文基于Keras框架构建GAN网络,解决图像锐化问题。首先介绍了GAN的基本网络架构,然后从数据、模型、训练等几个方面介绍GAN在图像锐化的应用。本文是一篇很好的GAN学习实例,并且给出了许多不错的GAN学习链接,对GAN感兴趣的读者不容错过!
作者 | Raphaël Meudec
编译 | 专知
参与 | Li Yongxi, Hujun
基于GAN实现图像锐化应用
2014年,Ian Goodfellow 提出了生成对抗网络(Generative Adversarial Networks,GAN),在这篇文章中我们介绍如何基于Keras框架构建GAN网络,解决图像锐化问题。
Keras代码可以在此处查看:
https://github.com/RaphaelMeudec/deblur-gan
原始论文见
https://arxiv.org/pdf/1711.07064.pdf。
Pytorch版本见https://github.com/KupynOrest/DeblurGAN/。
快速了解生成对抗网络
在生成式对抗网络中,两个网络互相对抗。其中,生成器通过创建伪造信号来误导判别器,而判别器需要判断输入的信号是真实的还是假造的。
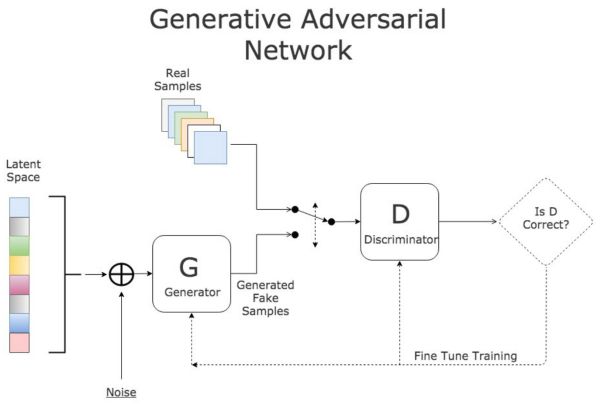
图GAN训练过程
其中,有三个主要的训练步骤:
使用生成器基于噪声伪造输入
同时使用真假数据训练判别器
训练整个模型:该模型通过将生成器与判别器相互连接,完成GAN训练流程。
将生成器与判别器链接在一起,原因是我们没有对于生成器输出的反馈,唯一的衡量标准是判别器是否接受生成的样本。
数据
Ian Goodfellow 首次应用GAN生成了MNIST数据,在本文,我们使用GAN进行图像锐化,因此,发生器的输入不是噪声,而是模糊的图像。
本次任务中,我们使用的数据集是GOPRO数据集,大家可以下载轻量级版本(9GB):https://drive.google.com/file/d/1H0PIXvJH4c40pk7ou6nAwoxuR4Qh_Sa2/view?usp=sharing,
或者完整的版本(35GB):https://drive.google.com/file/d/1SlURvdQsokgsoyTosAaELc4zRjQz9T2U/view?usp=sharing,它包含了来自多个街景的人工模糊图像。
我们首先将图像分配到两个不同文件夹中,A(模糊)和B(锐利)。A&B结果来自于这篇关于pix2pix的文章:https://phillipi.github.io/pix2pix/。我在仓库中创建了一个自定义脚本来实现这个任务,请按照README的步骤使用。
模型
训练过程保持不变,开始前,我们来看一下神经网络的架构。
生成器
生成器的目标是重现锐化的图像。该网络基于ResNet构建,它会跟踪原始模糊图像的变化,这篇文章中也提到了一种基于UNet网络的版本:https://arxiv.org/pdf/1505.04597.pdf。
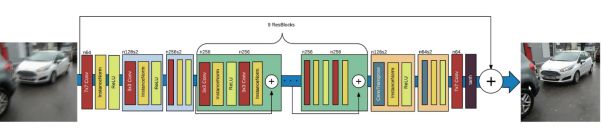
图:锐化GAN生成器网络架构:https://arxiv.org/pdf/1711.07064.pdf
方法的核心是应用于原始图像采样的9个ResNet块,下面我们来看看Keras的实现。
from keras.layers import Input, Conv2D, Activation, BatchNormalization
from keras.layers.merge import Add
from keras.layers.core import Dropout

def res_block(input, filters, kernel_size=(3,3), strides=(1,1),
use_dropout=False):
    """
    Instanciate a Keras Resnet Block using sequential API.
    :param input: Input tensor
    :param filters: Number of filters to use
    :param kernel_size: Shape of the kernel for the convolution
    :param strides: Shape of the strides for the convolution
    :param use_dropout: Boolean value to determine the use of dropout
    :return: Keras Model
    """
    x = ReflectionPadding2D((1,1))(input)
    x = Conv2D(filters=filters,
               kernel_size=kernel_size,
               strides=strides,)(x)
    x = BatchNormalization()(x)
    x = Activation('relu')(x)

    if use_dropout:
        x = Dropout(0.5)(x)

    x = ReflectionPadding2D((1,1))(x)
    x = Conv2D(filters=filters,
                kernel_size=kernel_size,
                strides=strides,)(x)
    x = BatchNormalization()(x)

    # Two convolution layers followed by a direct connection between
input and output
    merged = Add()([input, x])
    return merged
ResNet层是典型的卷积层,添加输入输出信息以形成最终的结果,
from keras.layers import Input, Activation, Add
from keras.layers.advanced_activations import LeakyReLU
from keras.layers.convolutional import Conv2D, Conv2DTranspose
from keras.layers.core import Lambda
from keras.layers.normalization import BatchNormalization
from keras.models import Model

from layer_utils import ReflectionPadding2D, res_block

ngf = 64
input_nc = 3
output_nc = 3
input_shape_generator = (256, 256, input_nc)
n_blocks_gen = 9


def generator_model():
    """Build generator architecture."""
    # Current version : ResNet block
    inputs = Input(shape=image_shape)

    x = ReflectionPadding2D((3, 3))(inputs)
    x = Conv2D(filters=ngf, kernel_size=(7,7), padding='valid')(x)
    x = BatchNormalization()(x)
    x = Activation('relu')(x)

    # Increase filter number
    n_downsampling = 2
    for i in range(n_downsampling):
        mult = 2**i
        x = Conv2D(filters=ngf*mult*2, kernel_size=(3,3), strides=2,
padding='same')(x)
        x = BatchNormalization()(x)
        x = Activation('relu')(x)

    # Apply 9 ResNet blocks
    mult = 2**n_downsampling
    for i in range(n_blocks_gen):
        x = res_block(x, ngf*mult, use_dropout=True)

    # Decrease filter number to 3 (RGB)
    for i in range(n_downsampling):
        mult = 2**(n_downsampling - i)
        x = Conv2DTranspose(filters=int(ngf * mult / 2),
kernel_size=(3,3), strides=2, padding='same')(x)
        x = BatchNormalization()(x)
        x = Activation('relu')(x)

    x = ReflectionPadding2D((3,3))(x)
    x = Conv2D(filters=output_nc, kernel_size=(7,7), padding='valid')(x)
    x = Activation('tanh')(x)

    # Add direct connection from input to output and recenter to [-1, 1]
    outputs = Add()([x, inputs])
    outputs = Lambda(lambda z: z/2)(outputs)

    model = Model(inputs=inputs, outputs=outputs, name='Generator')
    return model
按计划,9个ResNet块应用于输入的upsample版本。 我们增加了输入到输出的连接,并除以2以保持标准化的输出。
这就是生成器的实现,下面我们来看一下判别器的架构。
判别器
目标是确定输入图像是真实图片还是伪造的图片。 因此,判别器的结构是卷积层与输出层,输出结果是单个的值。
from keras.layers import Input
from keras.layers.advanced_activations import LeakyReLU
from keras.layers.convolutional import Conv2D
from keras.layers.core import Dense, Flatten
from keras.layers.normalization import BatchNormalization
from keras.models import Model

ndf = 64
output_nc = 3
input_shape_discriminator = (256, 256, output_nc)


def discriminator_model():
    """Build discriminator architecture."""
    n_layers, use_sigmoid = 3, False
    inputs = Input(shape=input_shape_discriminator)

    x = Conv2D(filters=ndf, kernel_size=(4,4), strides=2,
padding='same')(inputs)
    x = LeakyReLU(0.2)(x)

    nf_mult, nf_mult_prev = 1, 1
    for n in range(n_layers):
        nf_mult_prev, nf_mult = nf_mult, min(2**n, 8)
        x = Conv2D(filters=ndf*nf_mult, kernel_size=(4,4), strides=2,
padding='same')(x)
        x = BatchNormalization()(x)
        x = LeakyReLU(0.2)(x)

    nf_mult_prev, nf_mult = nf_mult, min(2**n_layers, 8)
    x = Conv2D(filters=ndf*nf_mult, kernel_size=(4,4), strides=1,
padding='same')(x)
    x = BatchNormalization()(x)
    x = LeakyReLU(0.2)(x)

    x = Conv2D(filters=1, kernel_size=(4,4), strides=1,
padding='same')(x)
    if use_sigmoid:
        x = Activation('sigmoid')(x)

    x = Flatten()(x)
    x = Dense(1024, activation='tanh')(x)
    x = Dense(1, activation='sigmoid')(x)

    model = Model(inputs=inputs, outputs=x, name='Discriminator')
    return model
最后是构建完整的模型,这个GAN的特殊之处在于输入是实际的图像,而不是噪声,因此,我们需要为生成器的输出引入直接反馈。
from keras.layers import Input
from keras.models import Model

def generator_containing_discriminator_multiple_outputs(generator,
discriminator):
    inputs = Input(shape=image_shape)
    generated_images = generator(inputs)
    outputs = discriminator(generated_images)
    model = Model(inputs=inputs, outputs=[generated_images, outputs])
    return model
接下来让我们看看两个特殊的损失函数。
训练
Losses
我们分别从两个级别提取losses:生成器级别和全模型级别。
生成器级别:根据生成器的输出计算损失函数,这个损失确保了GAN模型面向一个模糊的任务,它比较了VGG的第一个卷积的输出。
import keras.backend as K
from keras.applications.vgg16 import VGG16
from keras.models import Model

image_shape = (256, 256, 3)

def perceptual_loss(y_true, y_pred):
    vgg = VGG16(include_top=False, weights='imagenet',
input_shape=image_shape)
    loss_model = Model(inputs=vgg.input,
outputs=vgg.get_layer('block3_conv3').output)
    loss_model.trainable = False
    return K.mean(K.square(loss_model(y_true) - loss_model(y_pred)))
全模型级别使用Wasserstein loss,用来计算整个模型的损失。它计算了两个图像间的平均偏差。可以改善GAN的收敛性。
import keras.backend as K

def wasserstein_loss(y_true, y_pred):
    return K.mean(y_true*y_pred)
训练路线
第一步是载入数据并初始化模型,我们使用我们自定义的函数去载入数据集,并为模型增加Adam优化器,最后设置Keras的训练参数。
# Load dataset
data = load_images('./images/train', n_images)
y_train, x_train = data['B'], data['A']

# Initialize models
g = generator_model()
d = discriminator_model()
d_on_g = generator_containing_discriminator_multiple_outputs(g, d)

# Initialize optimizers
g_opt = Adam(lr=1E-4, beta_1=0.9, beta_2=0.999, epsilon=1e-08)
d_opt = Adam(lr=1E-4, beta_1=0.9, beta_2=0.999, epsilon=1e-08)
d_on_g_opt = Adam(lr=1E-4, beta_1=0.9, beta_2=0.999, epsilon=1e-08)

# Compile models
d.trainable = True
d.compile(optimizer=d_opt, loss=wasserstein_loss)
d.trainable = False
loss = [perceptual_loss, wasserstein_loss]
loss_weights = [100, 1]
d_on_g.compile(optimizer=d_on_g_opt, loss=loss, loss_weights=loss_weights)
d.trainable = True
之后,我们开始训练。
for epoch in range(epoch_num):
  print('epoch: {}/{}'.format(epoch, epoch_num))
  print('batches: {}'.format(x_train.shape[0] / batch_size))

  # Randomize images into batches
  permutated_indexes = np.random.permutation(x_train.shape[0])

  for index in range(int(x_train.shape[0] / batch_size)):
      batch_indexes = permutated_indexes[index*batch_size:(index+1)*
      batch_size]
      image_blur_batch = x_train[batch_indexes]
      image_full_batch = y_train[batch_indexes]
最后,我们成功地基于两个损失函数对生成器与判别器进行了训练。我们使用生成器输出了伪造图片,进而使用伪造图片与真实图片训练判别器对二者的评判区分。
for epoch in range(epoch_num):
  for index in range(batches):
    # [Batch Preparation]

    # Generate fake inputs
    generated_images = g.predict(x=image_blur_batch,
batch_size=batch_size)

    # Train multiple times discriminator on real and fake inputs
    for _ in range(critic_updates):
        d_loss_real = d.train_on_batch(image_full_batch,
output_true_batch)
        d_loss_fake = d.train_on_batch(generated_images,
output_false_batch)
        d_loss = 0.5 * np.add(d_loss_fake, d_loss_real)

    d.trainable = False
    # Train generator only on discriminator's decision and
generated images
    d_on_g_loss = d_on_g.train_on_batch(image_blur_batch,
[image_full_batch, output_true_batch])

    d.trainable = True
完整代码请参见:https://www.github.com/raphaelmeudec/deblur-gan
训练环境
在AWS Instance上使用Deep Learning AMI(3.0版本)。轻量级数据集,训练时间大约5小时。
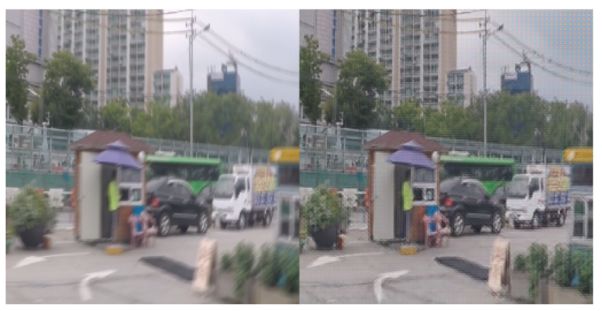
图像锐化结果
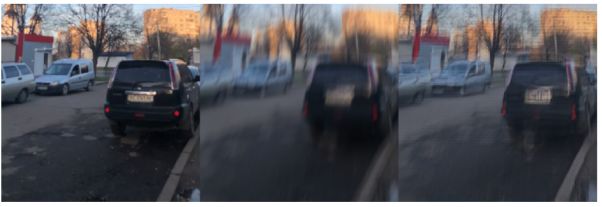
上图中是Keras锐化GAN的结果。即使在非常严重的模糊图片上,这一网络仍然可以给出更加锐利的图片。图中车灯更加锐利,树枝也更加清晰。
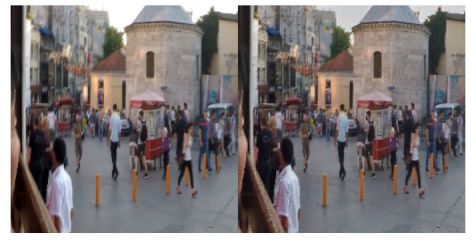
存在问题是模型在图像中引入了新的图案,这可能是由于使用VGG作为损失函数引起的。
如果你对计算机视觉感兴趣,这里有一篇基于内容的图像检索问题的介绍:
https://blog.sicara.com/keras-tutorial-content-based-image-retrieval-convolutional-denoising-autoencoder-dc91450cc511。
下面列出了一些GAN的优质资源。
GAN资源
NIPS 2016: Generative Adversarial Networks by Ian Goodfellow
https://channel9.msdn.com/Events/Neural-Information-Processing-Systems-Conference/Neural-Information-Processing-Systems-Conference-NIPS-2016/Generative-Adversarial-Networks
ICCV 2017: Tutorials on GAN
https://sites.google.com/view/iccv-2017-gans/schedule
GAN Implementations with Keras by Eric Linder-Noren
https://github.com/eriklindernoren/Keras-GAN
A List of Generative Adversarial Networks Resources by deeplearning4j
https://deeplearning4j.org/generative-adversarial-network
Really-awesome-gan by Holger Caesar
https://github.com/nightrome/really-awesome-gan
参考链接:
https://blog.sicara.com/keras-generative-adversarial-networks-image-deblurring-45e3ab6977b5
-END-
专 · 知
人工智能领域主题知识资料查看获取:【专知荟萃】人工智能领域26个主题知识资料全集(入门/进阶/论文/综述/视频/专家等)
请PC登录www.zhuanzhi.ai或者点击阅读原文,注册登录专知,获取更多AI知识资料!

请扫一扫如下二维码关注我们的公众号,获取人工智能的专业知识!

请加专知小助手微信(Rancho_Fang),加入专知主题人工智能群交流!加入专知主题群(请备注主题类型:AI、NLP、CV、 KG等)交流~
点击“阅读原文”,使用专知
展开全文