基于Keras进行迁移学习
编者按:数据科学家Prakash Jay介绍了迁移学习的原理,基于Keras实现迁移学习,以及迁移学习的常见情形。
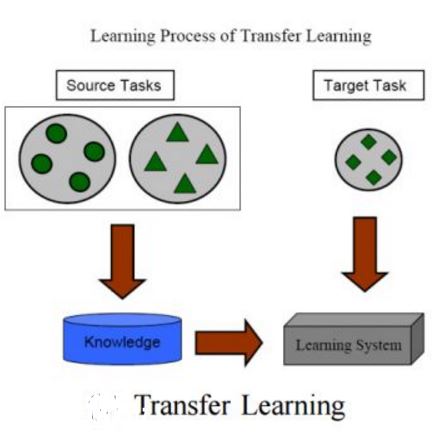
什么是迁移学习?
机器学习中的迁移学习问题,关注如何保存解决一个问题时获得的知识,并将其应用于另一个相关的不同问题。
为什么迁移学习?
在实践中,很少有人从头训练一个卷积网络,因为很难获取足够的数据集。使用预训练的网络有助于解决大多数手头的问题。
训练深度网络代价高昂。即使使用数百台配备了昂贵的GPU的机器,训练最复杂的模型也需要好多周。
决定深度学习的拓扑/特色/训练方法/超参数是没有多少理论指导的黑魔法。
我的经验
不要试图成为英雄。
—— Andrej Karapathy
我面对的大多数计算机视觉问题没有非常大的数据集(5000-40000图像)。即使使用极端的数据增强策略,也很难达到像样的精确度。而在少量数据集上训练数百万参数的网络通常会导致过拟合。所以迁移学习是我的救星。
迁移学习为何有效?
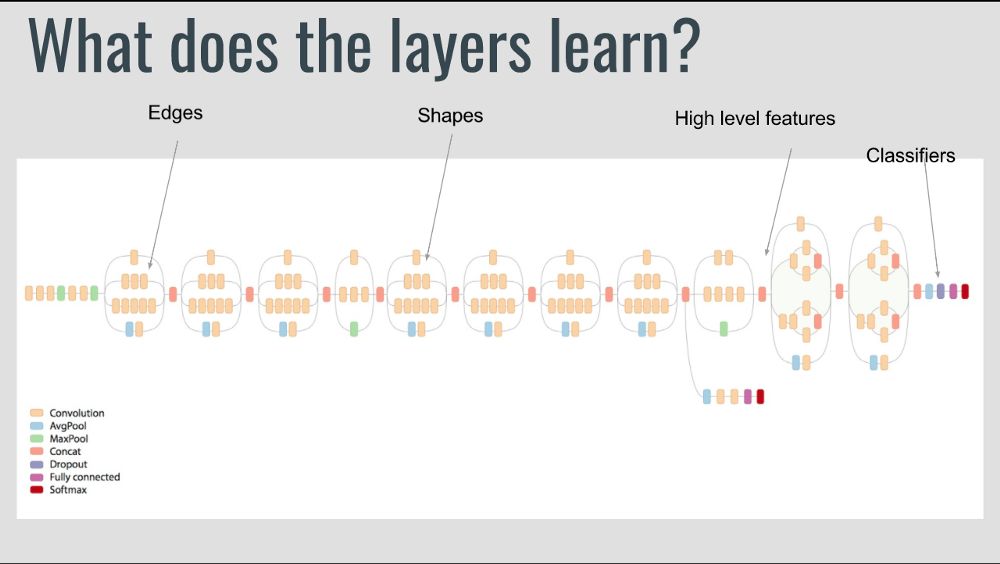
让我们看下深度学习网络学习了什么,靠前的层尝试检测边缘,中间层尝试检测形状,而靠后的层尝试检测高层数据特征。这些训练好的网络通常有助于解决其他计算机视觉问题。
下面,让我们看下如何使用Keras实现迁移学习,以及迁移学习的常见情形。
基于Keras的简单实现
     from keras import applications


     from keras.preprocessing.image import ImageDataGenerator


     from keras import optimizers


     from keras.models import Sequential, Model


     from keras.layers import Dropout, Flatten, Dense, GlobalAveragePooling2D


     from keras import backend as k


     from keras.callbacks import ModelCheckpoint, LearningRateScheduler, TensorBoard, EarlyStopping


     img_width, img_height = 256, 256


     train_data_dir = "data/train"


     validation_data_dir = "data/val"


     nb_train_samples = 4125


     nb_validation_samples = 466


     batch_size = 16


     epochs = 50


     model = applications.VGG19(weights = "imagenet", include_top=False, input_shape = (img_width, img_height, 3))


     """


     层 (类型)                 输出形状              参数数量


     =================================================================


     input_1 (InputLayer)         (None, 256, 256, 3)       0


     _________________________________________________________________


     block1_conv1 (Conv2D)        (None, 256, 256, 64)      1792


     _________________________________________________________________


     block1_conv2 (Conv2D)        (None, 256, 256, 64)      36928


     _________________________________________________________________


     block1_pool (MaxPooling2D)   (None, 128, 128, 64)      0


     _________________________________________________________________


     block2_conv1 (Conv2D)        (None, 128, 128, 128)     73856


     _________________________________________________________________


     block2_conv2 (Conv2D)        (None, 128, 128, 128)     147584


     _________________________________________________________________


     block2_pool (MaxPooling2D)   (None, 64, 64, 128)       0


     _________________________________________________________________


     block3_conv1 (Conv2D)        (None, 64, 64, 256)       295168


     _________________________________________________________________


     block3_conv2 (Conv2D)        (None, 64, 64, 256)       590080


     _________________________________________________________________


     block3_conv3 (Conv2D)        (None, 64, 64, 256)       590080


     _________________________________________________________________


     block3_conv4 (Conv2D)        (None, 64, 64, 256)       590080


     _________________________________________________________________


     block3_pool (MaxPooling2D)   (None, 32, 32, 256)       0


     _________________________________________________________________


     block4_conv1 (Conv2D)        (None, 32, 32, 512)       1180160


     _________________________________________________________________


     block4_conv2 (Conv2D)        (None, 32, 32, 512)       2359808


     _________________________________________________________________


     block4_conv3 (Conv2D)        (None, 32, 32, 512)       2359808


     _________________________________________________________________


     block4_conv4 (Conv2D)        (None, 32, 32, 512)       2359808


     _________________________________________________________________


     block4_pool (MaxPooling2D)   (None, 16, 16, 512)       0


     _________________________________________________________________


     block5_conv1 (Conv2D)        (None, 16, 16, 512)       2359808


     _________________________________________________________________


     block5_conv2 (Conv2D)        (None, 16, 16, 512)       2359808


     _________________________________________________________________


     block5_conv3 (Conv2D)        (None, 16, 16, 512)       2359808


     _________________________________________________________________


     block5_conv4 (Conv2D)        (None, 16, 16, 512)       2359808


     _________________________________________________________________


     block5_pool (MaxPooling2D)   (None, 8, 8, 512)         0


     =================================================================


     总参数: 20,024,384.0


     可训练参数: 20,024,384.0


     不可训练参数: 0.0


     """


     # 冻结不打算训练的层。这里我冻结了前5层。


     for layer in model.layers[:5]:


         layer.trainable = False


     # 增加定制层


     x = model.output


     x = Flatten()(x)


     x = Dense(1024, activation="relu")(x)


     x = Dropout(0.5)(x)


     x = Dense(1024, activation="relu")(x)


     predictions = Dense(16, activation="softmax")(x)


     # 创建最终模型


     model_final = Model(input = model.input, output = predictions)


     # 编译最终模型


     model_final.compile(loss = "categorical_crossentropy", optimizer = optimizers.SGD(lr=0.0001, momentum=0.9), metrics=["accuracy"])


     # 数据增强


     train_datagen = ImageDataGenerator(


     rescale = 1./255,


     horizontal_flip = True,


     fill_mode = "nearest",


     zoom_range = 0.3,


     width_shift_range = 0.3,


     height_shift_range=0.3,


     rotation_range=30)


     test_datagen = ImageDataGenerator(


     rescale = 1./255,


     horizontal_flip = True,


     fill_mode = "nearest",


     zoom_range = 0.3,


     width_shift_range = 0.3,


     height_shift_range=0.3,


     rotation_range=30)


     train_generator = train_datagen.flow_from_directory(


     train_data_dir,


     target_size = (img_height, img_width),


     batch_size = batch_size,


     class_mode = "categorical")


     validation_generator = test_datagen.flow_from_directory(


     validation_data_dir,


     target_size = (img_height, img_width),


     class_mode = "categorical")


     # 保存模型


     checkpoint = ModelCheckpoint("vgg16_1.h5", monitor='val_acc', verbose=1, save_best_only=True, save_weights_only=False, mode='auto', period=1)


     early = EarlyStopping(monitor='val_acc', min_delta=0, patience=10, verbose=1, mode='auto')


     # 训练模型


     model_final.fit_generator(


     train_generator,


     samples_per_epoch = nb_train_samples,


     epochs = epochs,


     validation_data = validation_generator,


     nb_val_samples = nb_validation_samples,


     callbacks = [checkpoint, early])
迁移学习的常见情形
别忘了,靠前的层中的卷积特征更通用,靠后的层中的卷积特征更针对原本的数据集。迁移学习有4种主要场景:
1. 新数据集较小,和原数据集相似
如果我们尝试训练整个网络,容易导致过拟合。由于新数据和原数据相似,因此我们期望卷积网络中的高层特征和新数据集相关。因此,建议冻结所有卷积层,只训练分类器(比如,线性分类器):
     for layer in model.layers:


        layer.trainable = False
2. 新数据集较大,和原数据集相似
由于我们有更多数据,我们更有自信,如果尝试对整个网络进行精细调整,不会导致过拟合。
     for layer in model.layers:


        layer.trainable = True
其实默认值就是True,上面的代码明确指定所有层可训练,是为了更清楚地强调这一点。
由于开始的几层检测边缘,你也可以选择冻结这些层。比如,以下代码冻结VGG19的前5层:
     for layer in model.layers[:5]:


        layer.trainable = False
3. 新数据集很小,但和原数据很不一样
由于数据集很小,我们大概想要从靠前的层提取特征,然后在此之上训练一个分类器:(假定你对h5py有所了解)
     from keras import applications


     from keras.preprocessing.image import ImageDataGenerator


     from keras import optimizers


     from keras.models import Sequential, Model


     from keras.layers import Dropout, Flatten, Dense, GlobalAveragePooling2D


     from keras import backend as k


     from keras.callbacks import ModelCheckpoint, LearningRateScheduler, TensorBoard, EarlyStopping


     img_width, img_height = 256, 256


     ### 创建网络


     img_input = Input(shape=(256, 256, 3))


     x = Conv2D(64, (3, 3), activation='relu', padding='same', name='block1_conv1')(img_input)


     x = Conv2D(64, (3, 3), activation='relu', padding='same', name='block1_conv2')(x)


     x = MaxPooling2D((2, 2), strides=(2, 2), name='block1_pool')(x)


     # 块2


     x = Conv2D(128, (3, 3), activation='relu', padding='same', name='block2_conv1')(x)


     x = Conv2D(128, (3, 3), activation='relu', padding='same', name='block2_conv2')(x)


     x = MaxPooling2D((2, 2), strides=(2, 2), name='block2_pool')(x)


     model = Model(input = img_input, output = x)


     model.summary()


     """


     _________________________________________________________________


     层 (类型)                 输出形状              参数数量


     =================================================================


     input_1 (InputLayer)         (None, 256, 256, 3)       0


     _________________________________________________________________


     block1_conv1 (Conv2D)        (None, 256, 256, 64)      1792


     _________________________________________________________________


     block1_conv2 (Conv2D)        (None, 256, 256, 64)      36928


     _________________________________________________________________


     block1_pool (MaxPooling2D)   (None, 128, 128, 64)      0


     _________________________________________________________________


     block2_conv1 (Conv2D)        (None, 128, 128, 128)     73856


     _________________________________________________________________


     block2_conv2 (Conv2D)        (None, 128, 128, 128)     147584


     _________________________________________________________________


     block2_pool (MaxPooling2D)   (None, 64, 64, 128)       0


     =================================================================


     总参数:260,160.0


     可训练参数:260,160.0


     不可训练参数:0.0


     """


     layer_dict = dict([(layer.name, layer) for layer in model.layers])


     [layer.name for layer in model.layers]


     """


     ['input_1',


      'block1_conv1',


      'block1_conv2',


      'block1_pool',


      'block2_conv1',


      'block2_conv2',


      'block2_pool']


     """


     import h5py


     weights_path = 'vgg19_weights.h5' # ('https://github.com/fchollet/deep-learning-models/releases/download/v0.1/vgg19_weights_tf_dim_ordering_tf_kernels.h5)


     f = h5py.File(weights_path)


     list(f["model_weights"].keys())


     """


     ['block1_conv1',


      'block1_conv2',


      'block1_pool',


      'block2_conv1',


      'block2_conv2',


      'block2_pool',


      'block3_conv1',


      'block3_conv2',


      'block3_conv3',


      'block3_conv4',


      'block3_pool',


      'block4_conv1',


      'block4_conv2',


      'block4_conv3',


      'block4_conv4',


      'block4_pool',


      'block5_conv1',


      'block5_conv2',


      'block5_conv3',


      'block5_conv4',


      'block5_pool',


      'dense_1',


      'dense_2',


      'dense_3',


      'dropout_1',


      'global_average_pooling2d_1',


      'input_1']


     """


     # 列出模型中的所有层的名称


     layer_names = [layer.name for layer in model.layers]


     """


     # 提取`.h5`文件中每层的模型权重


     >>> f["model_weights"]["block1_conv1"].attrs["weight_names"]


     array([b'block1_conv1/kernel:0', b'block1_conv1/bias:0'],


           dtype='|S21')


     # 将这一数组分配给weight_names


     >>> f["model_weights"]["block1_conv1"]["block1_conv1/kernel:0]


     <HDF5 dataset "kernel:0": shape (3, 3, 3, 64), type "<f4">


     # 列表推导(weights)储存层的权重和偏置


     >>>layer_names.index("block1_conv1")


     1


     >>> model.layers[1].set_weights(weights)


     # 为特定层设置权重。


     使用for循环我们可以为整个网络设置权重。


     """


     for i in layer_dict.keys():


         weight_names = f["model_weights"][i].attrs["weight_names"]


         weights = [f["model_weights"][i][j] for j in weight_names]


         index = layer_names.index(i)


         model.layers[index].set_weights(weights)


     import cv2


     import numpy as np


     import pandas as pd


     from tqdm import tqdm


     import itertools


     import glob


     features = []


     for i in tqdm(files_location):


             im = cv2.imread(i)


             im = cv2.resize(cv2.cvtColor(im, cv2.COLOR_BGR2RGB), (256, 256)).astype(np.float32) / 255.0


             im = np.expand_dims(im, axis =0)


             outcome = model_final.predict(im)


             features.append(outcome)


     ## 收集这些特征,创建一个dataframe,在其上训练一个分类器
以上代码提取block2_pool特征。通常而言,由于这层有64 x 64 x 128特征,在其上训练一个分类器可能于事无补。我们可以加上一些全连接层,然后在其基础上训练神经网络。
增加少量全连接层和一个输出层。
为靠前的层设置权重,然后冻结。
训练网络。
4. 新数据集很大,和原数据很不一样
由于你有一个很大的数据集,你可以设计你自己的网络,或者使用现有的网络。
你可以基于随机初始化权重或预训练网络权重初始化训练网络。一般选择后者。
你可以使用不同的网络,或者基于现有网络做些改动。
参考
cs231n课程中关于“迁移学习”的内容
Keras官网
有任何想法,或基于迁移学习做了什么有趣的事情,都欢迎留言。