ASP.NET Core WebAPI图片上传接口之集成IdentityServer4授权访问(附源码)
(点击上方蓝字,可快速关注我们)
来源:依乐祝
cnblogs.com/yilezhu/p/9315644.html
前言
上一篇关于《ASP.NET Core Web API图片上传》的文章使用的是mongoDB进行图片的存储,文章发布后,张队就来了一句,说没有使用GridFS。
的确博主只是进行了简单的图片上传以及mongoDB存储操作,目的是提供思路。具体的图片存储,有条件的还是基于阿里云OSS或者七牛吧,如果实在想用MongDB进行存储的话,建议采用GridFS的方式!
又有人说,GridFS大于16M的时候才适合使用,图片上传已经控制小于1M了,就没必要使用GridFS了吧。这里可以指定chunksize的大小。这样性能上就没有什么问题了。而且在性能差不多的时候使用GridFS可以更方便的管理。
因此建议如果采用MongDB进行文件存储的话,建议采用GridFS的方式。 这里特别感谢张队的耐心指导!
为什么使用IdentityServer4?
上一篇文章中,给大家讲解了如何通过 ASP.NET Core Web API实现图片上传的接口。这个接口是一个公开的接口,如何发布的话,任何知道调用方法的"任何人"都能任意的调用这个接口,俗称“裸奔”。
这时候我们就应该给接口加入认证以及访问控制机制,来加强安全性!那么我们怎么来实现接口的认证以及访问控制呢?这时候部分人就会很懵逼了,还有一部分人就会联想到 OpenID Connect 和 OAuth 2.0了!可是怎么实现呢?从到到位搭一个这样的框架,会累死我滴,可能还要经过很长时间的测试呢!别担心,这时候就体现出Asp.Net Core社区的强大了,我们的主角IdentityServer4闪亮登场!
IdentityServer4是什么?能帮我们做什么呢?
IdentityServer4是一套为 ASP.NET Core 2.0开发的基于OpenID Connect 和 OAuth 2.0 的框架,他能让我们的系统很轻松的就能很多认证以及授权相关的功能,比如:单点登录,api访问控制等等!其他的我就不介绍了,社区里面介绍的太多太多了!
如果有想了解的OAuth 2.0的可以看看阮一峰的这篇文章理解OAuth 2.0:http://www.ruanyifeng.com/blog/2014/05/oauth_2_0.html。
最后 IdentityServer4最最最大好处是开源的,用的人也多,而且比较成熟。想想是不是有点小激动,迫不及待的想试试了。
在开始之前
附上开源地址:https://github.com/IdentityServer/IdentityServer4]
以及详细文档:https://identityserver4.readthedocs.io/en/release/
想了解更多自行阅读官方文档吧!
为了演示的方便,本文采用的是客户端认证模式,至于其他的几种验证模式,大家可以看下上面给出的阮一峰的文章。
还有大家用之前要理解下身份认证服务器(IdentityServer),用户(User),客户端(Client),资源(Resources),身份令牌(Identity Token),访问令牌(Access Token)这些概念。
如果不清楚的话可以参考晓晨Master的这篇“ASP.NET Core的身份认证框架IdentityServer4-术语的解释”文章。
Asp.Net Core Web Api中如何使用IdentityServer4呢?
创建IdentityServer4服务端即“身份认证服务器(IdentityServer)”
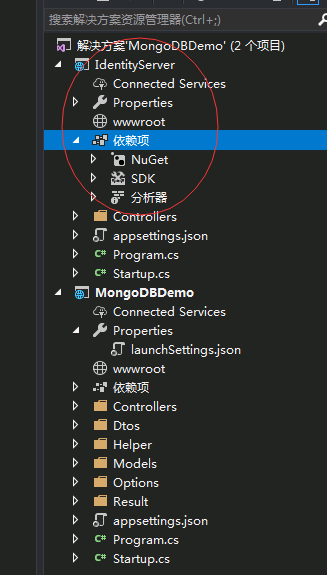
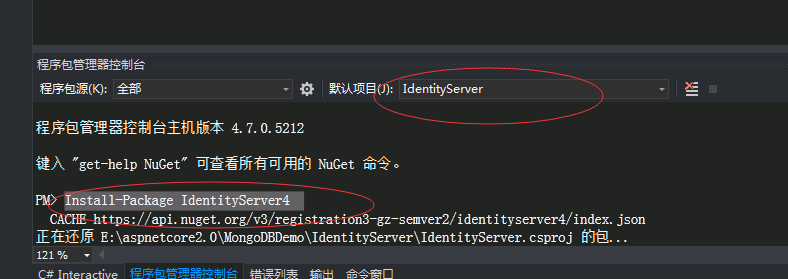
1、新建一个空的Asp.Net Core Web Api项目,名称为IdentityServer端口为5001,如下图所示
2、通过Nuget安装IdentityServer4命令如下,记得程序包管理控制套,上面的项目选择刚刚创建的IdentityServer项目
Install-Package IdentityServer4
这里因为采用OAuth 2.0的客户端模式,所以简单地使用一个类来硬编码一些资源(Resources)
以及客户端(Client),代码如下:
/// <summary>
/// yilezhu
/// 2018.7.15
/// 因为此处采用in-memory,所以硬编码一些api,以及client
/// </summary>
public class ApiConfig
{
/// <summary>
/// 定义ApiResource 这里的资源(Resources)指的就是我们的API
/// </summary>
/// <returns>ApiResource枚举</returns>
public static IEnumerable<ApiResource> GetApiResources()
{
return new[]
{
new ApiResource("PictureApi", "图片上传的APi")
};
}
/// <summary>
/// 定义受信任的客户端 Client
/// </summary>
/// <returns></returns>
public static IEnumerable<Client> GetClients()
{
return new[]
{
new Client
{
ClientId = "MobileUploadPicture",//客户端的标识,要是惟一的
ClientSecrets = new [] { new Secret("yilezhu123".Sha256()) },//客户端密码,进行了加密
AllowedGrantTypes = GrantTypes.ClientCredentials,//授权方式,这里采用的是客户端认证模式,只要ClientId,以及ClientSecrets正确即可访问对应的AllowedScopes里面的api资源
AllowedScopes = new [] { "PictureApi" }//定义这个客户端可以访问的APi资源数组,上面只有一个api
}
};
}
}
1、在Startup.cs中注入IdentityServer服务并使用中间件,代码如下:
// This method gets called by the runtime. Use this method to add services to the container.
public void ConfigureServices(IServiceCollection services)
{
//注入IdentityServer服务
services.AddIdentityServer()
.AddDeveloperSigningCredential()
.AddInMemoryClients(ApiConfig.GetClients())
.AddInMemoryApiResources(ApiConfig.GetApiResources());
services.AddMvc().SetCompatibilityVersion(CompatibilityVersion.Version_2_1);
}
// This method gets called by the runtime. Use this method to configure the HTTP request pipeline.
public void Configure(IApplicationBuilder app, IHostingEnvironment env)
{
if (env.IsDevelopment())
{
app.UseDeveloperExceptionPage();
}
//添加认证中间件
app.UseIdentityServer();
app.UseMvc();
}
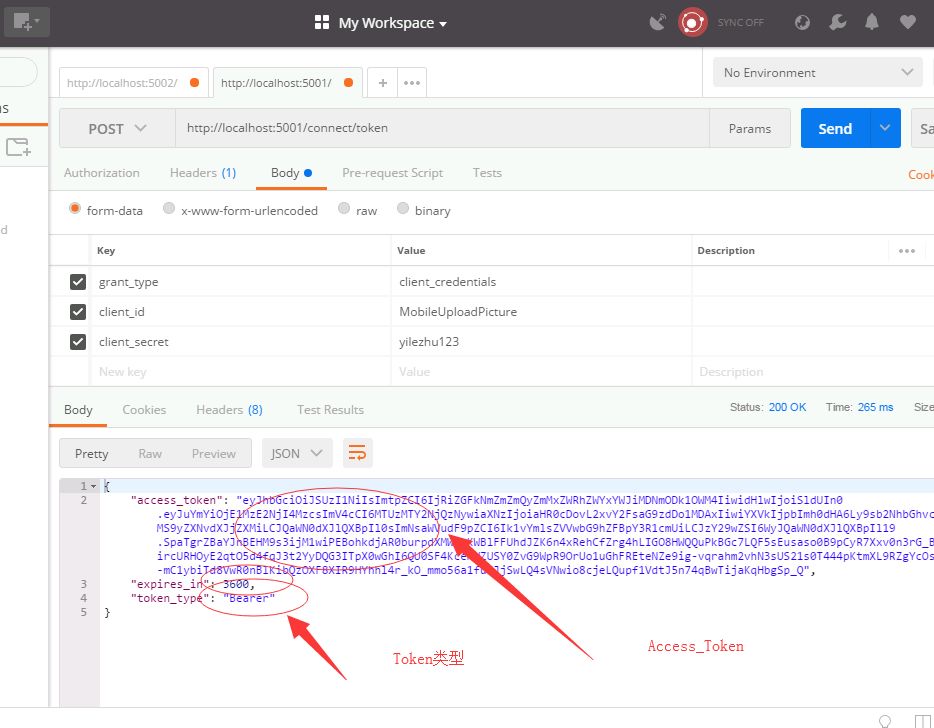
2、用Postman测试并获取AccessToken吧!如下图所示,在Post请求中传入,认证类型,client_id以及client_secret即可获取AccessToken:
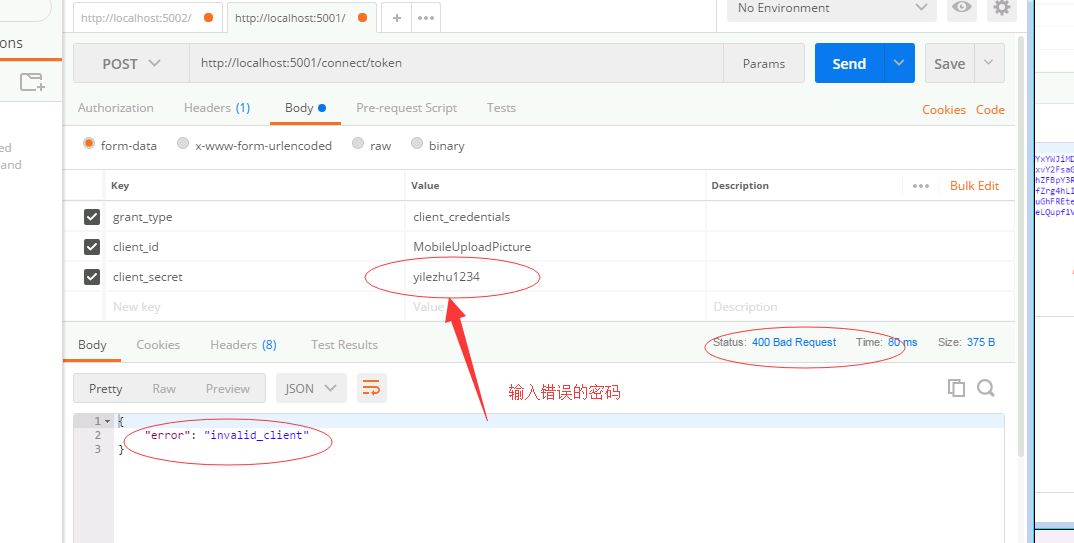
当传入错误的Client_id或者密码将出现下面的结果
至此IdentityServer服务已经简单地完成了!下面改造下我们的图片上传服务。
改造图片上传接口,加入授权认证
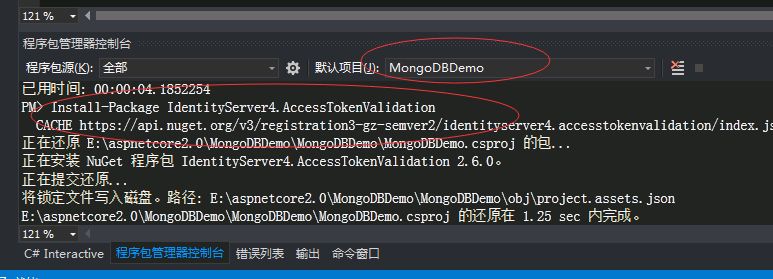
1、在图片上传api项目中添加IdentityServer nuget包,这里只需要加入AccessTokenValidation包即可,注意选择api项目:
Install-Package IdentityServer4.AccessTokenValidation
2、appsettings.json中加入IdentityServerOptions,进行IdentityServer的一些配置
"IdentityServerOptions": {
"ServerIP": "localhost",
"ServerPort": 5001,
"IdentityScheme": "Bearer",
"ResourceName": "PictureApi"
}
新建一个类用来匹配这个options,这样可以爽爽的使用:
/// <summary>
/// yilezhu
/// 2018.7.15
/// IdentityServer的配置选项
/// </summary>
public class IdentityServerOptions
{
/// <summary>
/// 授权服务器的Ip地址
/// </summary>
public string ServerIP { get; set; }
/// <summary>
/// 授权服务器的端口号
/// </summary>
public int ServerPort { get; set; }
/// <summary>
/// access_token的类型,获取access_token的时候返回参数中的token_type一致
/// </summary>
public string IdentityScheme { get; set; }
/// <summary>
/// 资源名称,认证服务注册的资源列表名称一致,
/// </summary>
public string ResourceName { get; set; }
}
在Startup.cs中加入identityServer验证
// This method gets called by the runtime. Use this method to add services to the container.
public void ConfigureServices(IServiceCollection services)
{
//注入Options
OptionsConfigure(services);
var identityServerOptions = new IdentityServerOptions();
Configuration.Bind("IdentityServerOptions", identityServerOptions);
services.AddAuthentication(identityServerOptions.IdentityScheme)
.AddIdentityServerAuthentication(options =>
{
options.RequireHttpsMetadata = false; //是否启用https
options.Authority = $"http://{identityServerOptions.ServerIP}:{identityServerOptions.ServerPort}";//配置授权认证的地址
options.ApiName = identityServerOptions.ResourceName; //资源名称,跟认证服务中注册的资源列表名称中的apiResource一致
}
);
services.AddMvc().SetCompatibilityVersion(CompatibilityVersion.Version_2_1);
}
// This method gets called by the runtime. Use this method to configure the HTTP request pipeline.
public void Configure(IApplicationBuilder app, IHostingEnvironment env)
{
if (env.IsDevelopment())
{
app.UseDeveloperExceptionPage();
}
app.UseAuthentication();
app.UseMvc();
}
/// <summary>
/// yilezhu
/// 2018.7.10
/// 注册Options
/// </summary>
/// <param name="services">服务容器</param>
private void OptionsConfigure(IServiceCollection services)
{
//MongodbHost信息
services.Configure<MongodbHostOptions>(Configuration.GetSection("MongodbHost"));
//图片选项
services.Configure<PictureOptions>(Configuration.GetSection("PictureOptions"));
}
为需要说全访问的图片上传接口添加[Authorize]特性,当然要引用下命名空间:
using Microsoft.AspNetCore.Authorization;
/// <summary>
/// 接口上传图片方法
/// </summary>
/// <param name="fileDtos">文件传输对象,传过来的json数据</param>
/// <returns>上传结果</returns>
[HttpPost]
[Authorize]
public async Task<UploadResult> Post([FromBody] FileDtos fileDtos)
{
…………
}
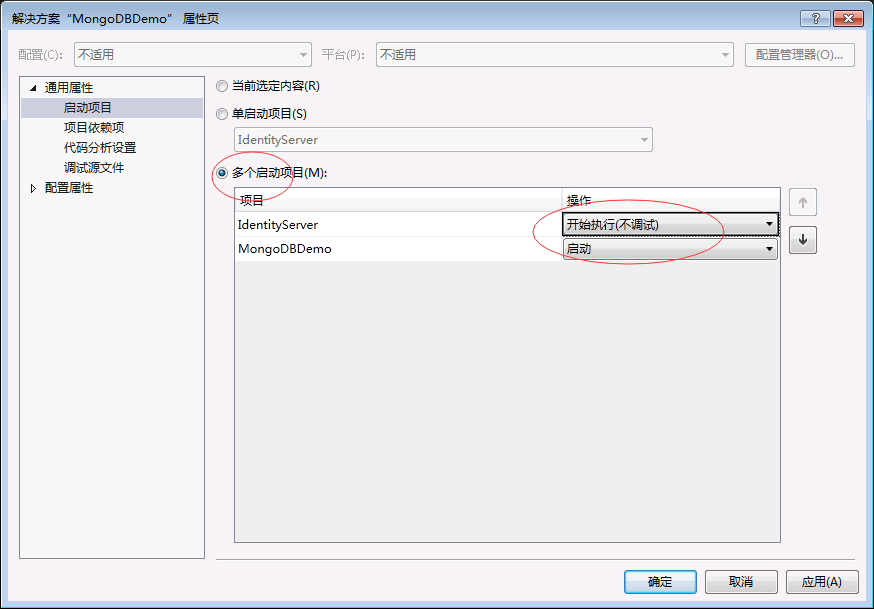
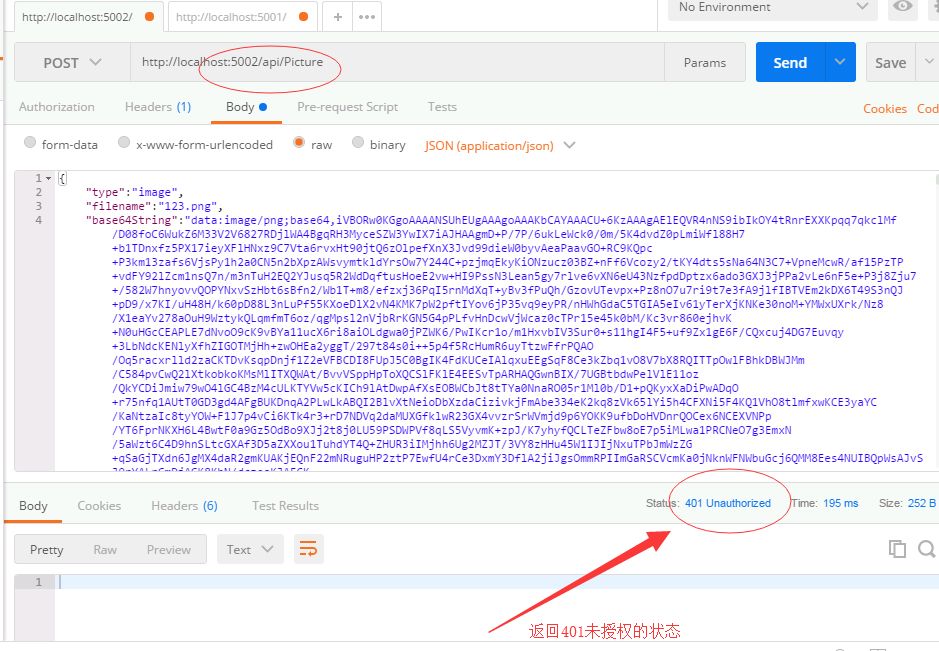
把授权服务以及图片上传接口同时启动下,然后Postman再次进行下图片上传的测试:
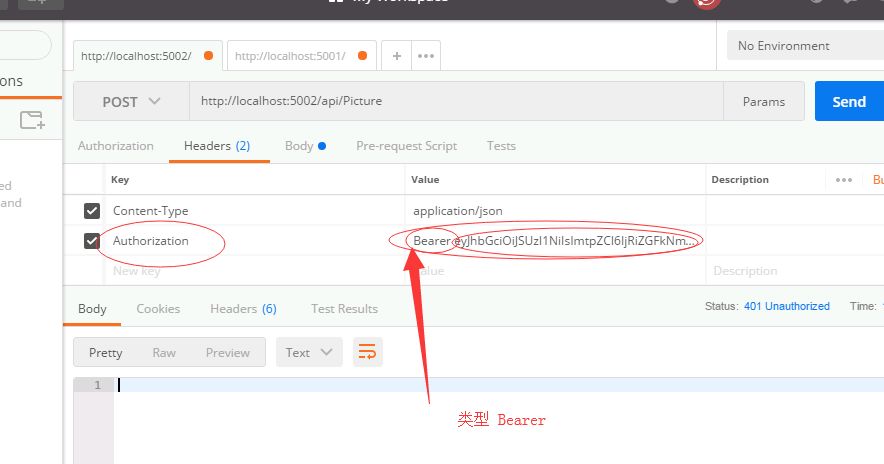
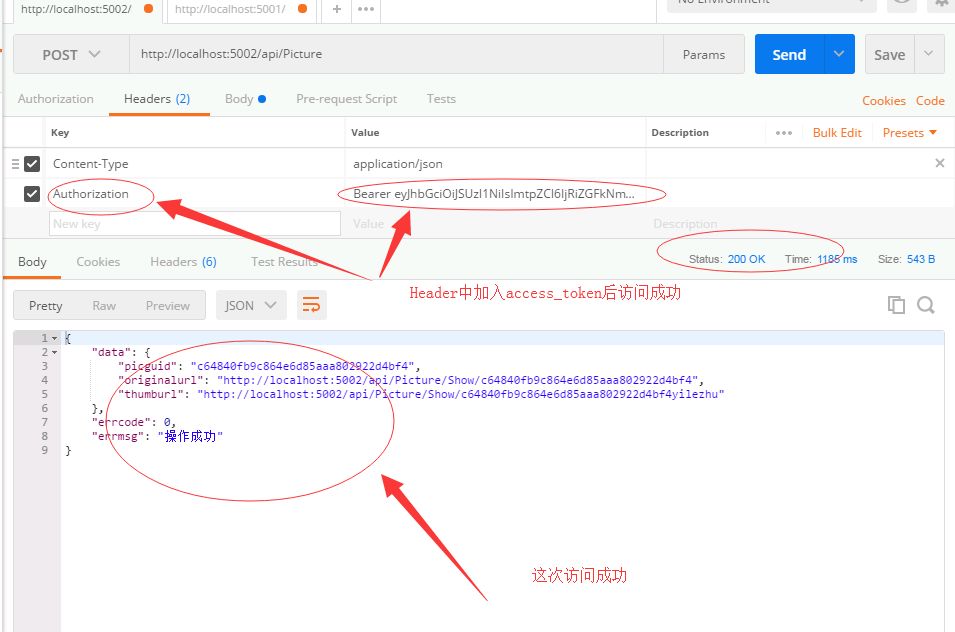
在请求头上加入我们获取的token信息,来再次访问下:
ASP.NET Core Web API图片上传接口集成Identity Server 4安全认证实例教程到此结束了。
示例代码:https://github.com/yilezhu/ImageUploadApiDemo
总结
本文通过图片上传这个Asp.Net Core Web Api做引子,然后引入Identity Server 4。然后通过一个简单地实例教程阐述了如何创建Identity Server 以及接口中如何进行授权认证访问。
博主尽量采用通俗易懂的语言进行阐述,步骤也尽量详细,目的就是为了让初学者也能按照步骤一步一步的实现Identity Server 4的认证。
下一篇我会加入SwaggerUI生成接口文档,当然大家也可以看下我的这篇关于SwaggerUI的文章《ASP.NET Core WebApi使用Swagger生成api说明文档看这篇就够了》。
这个系列的教程源码,我已经放在github上了,大家可以点这里进行访问源代码。https://github.com/yilezhu/ImageUploadApiDemo
看完本文有收获?请转发分享给更多人
关注「DotNet」,提升.Net技能