实践 | 目前最快精度最高检测框架(EfficientDet)
计算机视觉研究院专栏
作者:Edison_G
疫情以来,各种大型国际会议有如火如荼的开展起来。目前,已经被研究出很多高效高精度的框架,在深度学习领域,模型效率也是越来越重的一个研究课题。不仅仅停留在训练的提速,现在推理应用的速度更加关键。因此,现在很多研究趋势朝着更高效更小型化发展!
项目链接:https://github.com/signatrix/efficientdet
怎么使用代码实践?

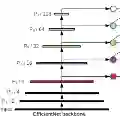
实践结果

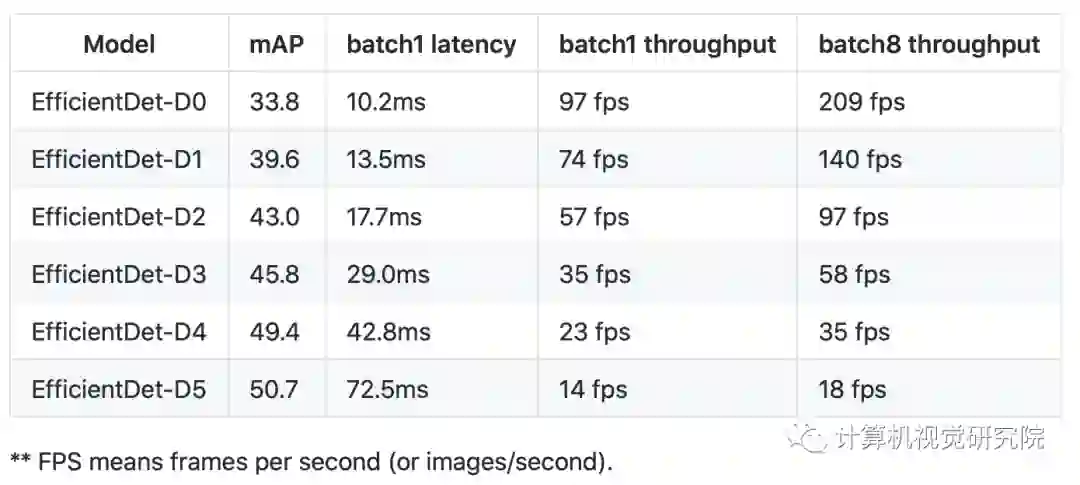
Benchmark model latency
There are two types of latency: network latency and end-to-end latency.
(1) To measure the network latency (from the fist conv to the last class/box prediction output), use the following command:
!python model_inspect.py --runmode=bm --model_name=efficientdet-d0
** add --hparams="precision=mixed-float16" if running on V100.
On single Tesla V100 without TensorRT, our D0 network (no pre/post-processing) has 134 FPS (frame per second) for batch size 1, and 238 FPS for batch size 8.
(2) To measure the end-to-end latency (from the input image to the final rendered new image, including: image preprocessing, network, postprocessing and NMS), use the following command:
!rm  -rf /tmp/benchmark/
!python model_inspect.py --runmode=saved_model --model_name=efficientdet-d0 \
  --ckpt_path=efficientdet-d0 --saved_model_dir=/tmp/benchmark/ \

!python model_inspect.py --runmode=saved_model_benchmark \
  --saved_model_dir=/tmp/benchmark/efficientdet-d0_frozen.pb \
  --model_name=efficientdet-d0  --input_image=testdata/img1.jpg  \
  --output_image_dir=/tmp/  \
On single Tesla V100 without using TensorRT, our end-to-end latency and throughput are:
Inference for images
# Step0: download model and testing image.
!export MODEL=efficientdet-d0
!export CKPT_PATH=efficientdet-d0
!wget https://storage.googleapis.com/cloud-tpu-checkpoints/efficientdet/coco/${MODEL}.tar.gz
!wget https://user-images.githubusercontent.com/11736571/77320690-099af300-6d37-11ea-9d86-24f14dc2d540.png -O img.png
!tar xf ${MODEL}.tar.gz

# Step 1: export saved model.
!python model_inspect.py --runmode=saved_model \
  --model_name=efficientdet-d0 --ckpt_path=efficientdet-d0 \
  --hparams="image_size=1920x1280" \
  --saved_model_dir=/tmp/saved_model

# Step 2: do inference with saved model.
!python model_inspect.py --runmode=saved_model_infer \
  --model_name=efficientdet-d0  \
  --saved_model_dir=/tmp/saved_model  \
  --input_image=img.png --output_image_dir=/tmp/
# you can visualize the output /tmp/0.jpg
Alternatively, if you want to do inference using frozen graph instead of saved model, you can run
# Step 0 and 1 is the same as before.
# Step 2: do inference with frozen graph.
!python model_inspect.py --runmode=saved_model_infer \
  --model_name=efficientdet-d0  \
  --saved_model_dir=/tmp/saved_model/efficientdet-d0_frozen.pb  \
  --input_image=img.png --output_image_dir=/tmp/
Lastly, if you only have one image and just want to run a quick test, you can also run the following command (it is slow because it needs to construct the graph from scratch):
# Run inference for a single image.
!python model_inspect.py --runmode=infer --model_name=$MODEL \
  --hparams="image_size=1920x1280"  --max_boxes_to_draw=100   --min_score_thresh=0.4 \
  --ckpt_path=$CKPT_PATH --input_image=img.png --output_image_dir=/tmp
# you can visualize the output /tmp/0.jpg
Inference for videos
You can run inference for a video and show the results online:
# step 0: download the example video.
!wget https://storage.googleapis.com/cloud-tpu-checkpoints/efficientdet/data/video480p.mov -O input.mov

# step 1: export saved model.
!python model_inspect.py --runmode=saved_model \
  --model_name=efficientdet-d0 --ckpt_path=efficientdet-d0 \
  --saved_model_dir=/tmp/savedmodel

# step 2: inference video using saved_model_video.
!python model_inspect.py --runmode=saved_model_video \
  --model_name=efficientdet-d0 \
  --saved_model_dir=/tmp/savedmodel --input_video=input.mov

# alternative step 2: inference video and save the result.
!python model_inspect.py --runmode=saved_model_video \
  --model_name=efficientdet-d0   \
  --saved_model_dir=/tmp/savedmodel --input_video=input.mov  \
  --output_video=output.mov
Eval on COCO 2017 val or test-dev
// Download coco data.
!wget http://images.cocodataset.org/zips/val2017.zip
!wget http://images.cocodataset.org/annotations/annotations_trainval2017.zip
!unzip val2017.zip
!unzip annotations_trainval2017.zip

// convert coco data to tfrecord.
!mkdir tfrecord
!PYTHONPATH=".:$PYTHONPATH"  python dataset/create_coco_tfrecord.py \
    --image_dir=val2017 \
    --caption_annotations_file=annotations/captions_val2017.json \
    --output_file_prefix=tfrecord/val \
    --num_shards=32

// Run eval.
!python main.py --mode=eval  \
    --model_name=${MODEL}  --model_dir=${CKPT_PATH}  \
    --validation_file_pattern=tfrecord/val*  \
    --val_json_file=annotations/instances_val2017.json
You can also run eval on test-dev set with the following command:
!wget http://images.cocodataset.org/zips/test2017.zip
!unzip -q test2017.zip
!wget http://images.cocodataset.org/annotations/image_info_test2017.zip
!unzip image_info_test2017.zip

!mkdir tfrecord
!PYTHONPATH=".:$PYTHONPATH"  python dataset/create_coco_tfrecord.py \
      --image_dir=test2017 \
      --image_info_file=annotations/image_info_test-dev2017.json \
      --output_file_prefix=tfrecord/testdev \
      --num_shards=32

# Eval on test-dev: testdev_dir must be set.
# Also, test-dev has 20288 images rather than val 5000 images.
!python main.py --mode=eval  \
    --model_name=${MODEL}  --model_dir=${CKPT_PATH}  \
    --validation_file_pattern=tfrecord/testdev*  \
    --testdev_dir='testdev_output' --eval_samples=20288
# Now you can submit testdev_output/detections_test-dev2017_test_results.json to
# coco server: https://competitions.codalab.org/competitions/20794#participate
Train on PASCAL VOC 2012 with backbone ImageNet ckpt
# Download and convert pascal data.
!wget http://host.robots.ox.ac.uk/pascal/VOC/voc2012/VOCtrainval_11-May-2012.tar
!tar xf VOCtrainval_11-May-2012.tar
!mkdir tfrecord
!PYTHONPATH=".:$PYTHONPATH"  python dataset/create_pascal_tfrecord.py  \
    --data_dir=VOCdevkit --year=VOC2012  --output_path=tfrecord/pascal

# Download backbone checkopints.
!wget https://storage.googleapis.com/cloud-tpu-checkpoints/efficientnet/ckptsaug/efficientnet-b0.tar.gz
!tar xf efficientnet-b0.tar.gz

!python main.py --mode=train_and_eval \
    --training_file_pattern=tfrecord/pascal*.tfrecord \
    --validation_file_pattern=tfrecord/pascal*.tfrecord \
    --model_name=efficientdet-d0 \
    --model_dir=/tmp/efficientdet-d0-scratch  \
    --backbone_ckpt=efficientnet-b0  \
    --train_batch_size=8 \
    --eval_batch_size=8 --eval_samples=512 \
    --num_examples_per_epoch=5717 --num_epochs=1  \
    --hparams="num_classes=20,moving_average_decay=0"
Finetune on PASCAL VOC 2012 with detector COCO ckpt.
Create a config file for the PASCAL VOC dataset called voc_config.yaml and put this in it.
  num_classes: 20
  moving_average_decay: 0
Download efficientdet coco checkpoint.
!wget https://storage.googleapis.com/cloud-tpu-checkpoints/efficientdet/coco/efficientdet-d0.tar.gz
!tar xf efficientdet-d0.tar.gz
Finetune needs to use --ckpt rather than --backbone_ckpt.
!python main.py --mode=train_and_eval \
    --training_file_pattern=tfrecord/pascal*.tfrecord \
    --validation_file_pattern=tfrecord/pascal*.tfrecord \
    --model_name=efficientdet-d0 \
    --model_dir=/tmp/efficientdet-d0-finetune  \
    --ckpt=efficientdet-d0  \
    --train_batch_size=8 \
    --eval_batch_size=8 --eval_samples=1024 \
    --num_examples_per_epoch=5717 --num_epochs=1  \
    --hparams=voc_config.yaml
If you want to do inference for custom data, you can run
# Setting hparams-flag is needed sometimes.
!python model_inspect.py --runmode=infer \
  --model_name=efficientdet-d0   --ckpt_path=efficientdet-d0 \
  --hparams=voc_config.yaml  \
  --input_image=img.png --output_image_dir=/tmp/
You should check more details of runmode which is written in caption-4
Train on multi GPUs.
Install horovod.
Create a config file for the PASCAL VOC dataset called voc_config.yaml and put this in it.
  num_classes: 20
  moving_average_decay: 0
Download efficientdet coco checkpoint.
!wget https://storage.googleapis.com/cloud-tpu-checkpoints/efficientdet/coco/efficientdet-d0.tar.gz
!tar xf efficientdet-d0.tar.gz
Finetune needs to use --ckpt rather than --backbone_ckpt.
!horovodrun -np <num_gpus> -H localhost:<num_gpus> python main.py --mode=train \
    --training_file_pattern=tfrecord/pascal*.tfrecord \
    --validation_file_pattern=tfrecord/pascal*.tfrecord \
    --model_name=efficientdet-d0 \
    --model_dir=/tmp/efficientdet-d0-finetune  \
    --ckpt=efficientdet-d0  \
    --train_batch_size=8 \
    --eval_batch_size=8 --eval_samples=1024 \
    --num_examples_per_epoch=5717 --num_epochs=1  \
    --hparams=voc_config.yaml
    --strategy=horovod
If you want to do inference for custom data, you can run
# Setting hparams-flag is needed sometimes.
!python model_inspect.py --runmode=infer \
  --model_name=efficientdet-d0   --ckpt_path=efficientdet-d0 \
  --hparams=voc_config.yaml  \
  --input_image=img.png --output_image_dir=/tmp/
You should check more details of runmode which is written in caption-4.
Training EfficientDets on TPUs.
To train this model on Cloud TPU, you will need:
A GCE VM instance with an associated Cloud TPU resource.
A GCS bucket to store your training checkpoints (the "model directory").
Install latest TensorFlow for both GCE VM and Cloud.
Then train the model:
!export PYTHONPATH="$PYTHONPATH:/path/to/models"
!python main.py --tpu=TPU_NAME --training_file_pattern=DATA_DIR/*.tfrecord --model_dir=MODEL_DIR --strategy=tpu

# TPU_NAME is the name of the TPU node, the same name that appears when you run gcloud compute tpus list, or ctpu ls.
# MODEL_DIR is a GCS location (a URL starting with gs:// where both the GCE VM and the associated Cloud TPU have write access.
# DATA_DIR is a GCS location to which both the GCE VM and associated Cloud TPU have read access.
For more instructions about training on TPUs, please refer to the following tutorials:
EfficientNet tutorial: https://cloud.google.com/tpu/docs/tutorials/efficientnet
RetinaNet tutorial: https://cloud.google.com/tpu/docs/tutorials/retinanet
NOTE: this is not an official Google product.

扫码关注我们
公众号 : 计算机视觉战队