iOS使用带字体图标的UIButton(支持各种方向)
1.图标字体的导入及使用: https://segmentfault.com/a/1190000004300281
2.我使用的是继承的方式,没有使用原生UIButton的title和imageView,而是自己增加两个UILabel到UIButton上去,好处是是按钮可以高度自定义,布局采用的是Masonry自适应。
3.相关代码:
ZMButton.h
#import <UIKit/UIKit.h>
/**
* 默认图标在右边
*/
typedef NS_ENUM(NSInteger,ButtonIconType) {
ButtonIconTypeNormal = 0,
ButtonIconTypeLeft,
ButtonIconTypeTop,
ButtonIconTypeBottom
};
@interface ZMButton : UIButton
/** 标题标签 */
@property (nonatomic, strong) UILabel *buttonTitleLabel;
/** 字体图标标签 */
@property (nonatomic, strong) UILabel *buttonIconLabel;
/** 标题 */
@property (nonatomic, copy) NSString *buttonTitle;
/** 图标 */
@property (nonatomic, copy) NSString *buttonIcon;
/** 图标类型 */
@property (nonatomic, assign) ButtonIconType iconType;
/** 公共间距 */
@property (nonatomic, assign) CGFloat margin;
/** 左间距 */
@property (nonatomic, assign) CGFloat marginLeft;
/** 上间距 */
@property (nonatomic, assign) CGFloat marginTop;
/** 按钮总宽度(包含间距) */
@property (nonatomic, assign) CGFloat totalWidth;
/** 字体 */
@property (nonatomic, strong) UIFont *titleFont;
/** 字体大小 */
@property (nonatomic, assign) CGFloat titleFontSize;
/** 字体size */
@property (nonatomic, assign) CGSize titleSize;
/** 图标字体 */
@property (nonatomic, strong) UIFont *iconFont;
/** 图标字体大小 */
@property (nonatomic, assign) CGFloat iconFontSize;
/** 图标size */
@property (nonatomic, assign) CGSize iconSize;
/** 标题颜色 */
@property (nonatomic, strong) UIColor *titleColor;
/** 图标颜色 */
@property (nonatomic, strong) UIColor *iconColor;
- (instancetype)initWithTitle:(NSString *)title icon:(NSString *)icon iconType:(ButtonIconType)iconType;
- (void)setupUI;
@end
ZMButton.m
#import "ZMButton.h"
@implementation ZMButton
- (UILabel *)buttonTitleLabel{
if (!_buttonTitleLabel) {
_buttonTitleLabel = [[UILabel alloc] init];
_buttonTitleLabel.font = _titleFont;
_buttonTitleLabel.textColor = _titleColor;
[self addSubview:_buttonTitleLabel];
[_buttonTitleLabel mas_makeConstraints:^(MASConstraintMaker *make) {
if (_iconType == ButtonIconTypeNormal) {
make.left.mas_equalTo(self.marginLeft);
make.centerY.mas_equalTo(self);
}else if (_iconType == ButtonIconTypeLeft){
make.centerY.mas_equalTo(self);
make.left.mas_equalTo(self.buttonIconLabel.mas_right).with.offset(_margin);
//make.right.mas_equalTo(-_margin);
}else if (_iconType == ButtonIconTypeTop){
make.top.mas_equalTo(self.buttonIconLabel.mas_bottom).with.offset(_margin);
make.height.mas_equalTo(_titleSize.height);
make.centerX.mas_equalTo(self);
}else if (_iconType == ButtonIconTypeBottom){
make.top.mas_equalTo((self.height - _titleSize.height - _iconSize.height - _margin)/2);
make.height.mas_equalTo(_titleSize.height);
make.centerX.mas_equalTo(self);
}
}];
}
return _buttonTitleLabel;
}
- (UILabel *)buttonIconLabel{
if (!_buttonIconLabel) {
_buttonIconLabel = [[UILabel alloc] init];
_buttonIconLabel.font = [ZMFont iconOutlineFontWithSize:_iconFontSize];
_buttonIconLabel.textColor = _iconColor;
[self addSubview:_buttonIconLabel];
[_buttonIconLabel mas_makeConstraints:^(MASConstraintMaker *make) {
if (_iconType == ButtonIconTypeNormal) {
//make.right.mas_equalTo(-_margin);
make.left.mas_equalTo(self.buttonTitleLabel.mas_right).with.offset(_margin);
make.centerY.mas_equalTo(self);
}else if (_iconType == ButtonIconTypeLeft){
make.left.mas_equalTo(self.marginLeft);
make.centerY.mas_equalTo(self);
}else if (_iconType == ButtonIconTypeTop){
make.top.mas_equalTo(self.marginTop);
make.centerX.mas_equalTo(self);
make.height.mas_equalTo(_iconSize.height);
}else if (_iconType == ButtonIconTypeBottom){
make.top.mas_equalTo(self.buttonTitleLabel.mas_bottom).with.offset(_margin);
make.height.mas_equalTo(_iconSize.height);
make.centerX.mas_equalTo(self);
}
}];
}
return _buttonIconLabel;
}
#pragma mark - 间距的get方法
- (CGFloat)marginLeft{
return (self.width - _iconSize.width - _titleSize.width - _margin) /2;
}
- (CGFloat)marginTop{
return (self.height - _titleSize.height - _iconSize.height - _margin)/2;
}
- (instancetype)initWithTitle:(NSString *)title icon:(NSString *)icon iconType:(ButtonIconType)iconType{
self = [super init];
if (self) {
self.layer.borderWidth = 1/YYScreenScale();
self.layer.borderColor = [UIColor blackColor].CGColor;
NSAssert(title.length, @"title is null");
NSAssert(icon.length, @"icon is null");
_buttonTitle = title;
_buttonIcon = icon;
_iconType = iconType;
_titleFontSize = 15;
_iconFontSize = 15;
_margin = 5;
_titleFont = [UIFont systemFontOfSize:_titleFontSize];
_iconFont = [ZMFont iconOutlineFontWithSize:_iconFontSize];
_titleColor = [UIColor colorWithHexString:@"#757374"];
_iconColor = [UIColor colorWithHexString:@"#757374"];
_titleSize = [title sizeForFont:_titleFont size:CGSizeMake(kScreenWidth, _titleFontSize * 2) mode:NSLineBreakByWordWrapping];
_iconSize = [icon sizeForFont:_iconFont size:CGSizeMake(kScreenWidth, _iconFontSize * 2) mode:0];
[self getTotalWidth];
}
return self;
}
#pragma mark - 设置按钮数据
- (void)setupUI{
self.buttonTitleLabel.text = self.buttonTitle;
self.buttonIconLabel.text = self.buttonIcon;
}
#pragma mark - 设置标题数据 (调用此方法可重写设置按钮标题)
- (void)setButtonTitle:(NSString *)buttonTitle{
if (buttonTitle.length) {
_buttonTitle = buttonTitle;
self.buttonTitleLabel.text = buttonTitle;
_titleSize = [_buttonTitle sizeForFont:_titleFont size:CGSizeMake(kScreenWidth, _titleFontSize * 2) mode:NSLineBreakByWordWrapping];
[self getTotalWidth];
[self mas_updateConstraints:^(MASConstraintMaker *make) {
make.width.mas_equalTo(self.totalWidth);
}];
[self.superview layoutIfNeeded];
self.marginLeft = (self.width - _titleSize.width - _iconSize.width - _margin)/2;
if (self.iconType == ButtonIconTypeNormal) {
[self.buttonTitleLabel mas_updateConstraints:^(MASConstraintMaker *make) {
make.left.mas_equalTo(self.marginLeft);
}];
}else if (self.iconType == ButtonIconTypeLeft) {
[self.buttonIconLabel mas_updateConstraints:^(MASConstraintMaker *make) {
make.left.mas_equalTo(self.marginLeft);
}];
}
}
}
#pragma mark - 计算总宽度
- (void)getTotalWidth{
if (_iconType == ButtonIconTypeNormal || _iconType == ButtonIconTypeLeft) {
self.totalWidth = _titleSize.width + _iconSize.width + _margin * 3;
}else{
self.totalWidth = _titleSize.width + _margin * 2;
}
}
@end
4.如何使用:
//图标在左
ZMButton *iconButtonLeft = [[ZMButton alloc] initWithTitle:@"文字在右" icon:@"\U0000e6df\U0000ea9b" iconType:ButtonIconTypeLeft];
iconButtonLeft.margin = 10;
iconButtonLeft.titleColor = [UIColor colorWithHexString:@"#DC143C"];
iconButtonLeft.tag = 1;
[self.view addSubview:iconButtonLeft];
[iconButtonLeft mas_makeConstraints:^(MASConstraintMaker *make) {
make.top.mas_equalTo(20);
make.width.mas_equalTo(120);
make.centerX.mas_equalTo(self.view);
}];
[iconButtonLeft.superview layoutIfNeeded];
[iconButtonLeft setupUI];
[iconButtonLeft addTarget:self action:@selector(clickButton:) forControlEvents:UIControlEventTouchUpInside];
//图标在右
ZMButton *iconButtonRight = [[ZMButton alloc] initWithTitle:@"文字在左" icon:@"\U0000e6df" iconType:ButtonIconTypeNormal];
[self.view addSubview:iconButtonRight];
[iconButtonRight mas_makeConstraints:^(MASConstraintMaker *make) {
make.top.mas_equalTo(iconButtonLeft.mas_bottom).with.offset(20);
make.centerX.mas_equalTo(self.view);
make.width.mas_equalTo(120);
make.height.mas_equalTo(40);
}];
[iconButtonRight.superview layoutIfNeeded];
[iconButtonRight setupUI];
[iconButtonRight addTarget:self action:@selector(clickButton:) forControlEvents:UIControlEventTouchUpInside];
5.相关界面,初始化按钮之后,文本也可以随时修改,支持多个图标,代码中加入了FLEX,可以摇一摇试试~
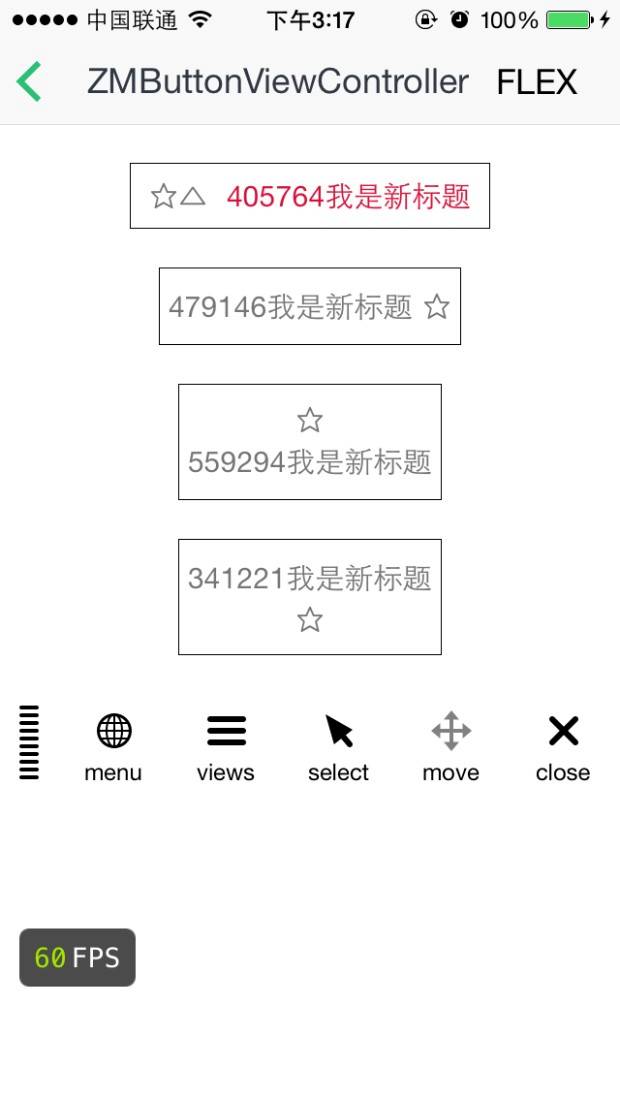
image.png
6.代码地址奉上:https://github.com/Brances/ZMProject,可能代码写的不是很好,还请各位大神多指教。
著作权归作者所有。商业转载请联系作者获得授权,非商业转载请注明出处。