iOS 简单的头部缩放效果
本公众号内容均为本号转发,已尽可能注明出处。因未能核实来源或转发内容图片有权利瑕疵的,请及时联系本号,本号会第一时间进行修改或删除。 QQ : 3442093904
简单实现并集成一个头部缩放的功能,适用于UIScrollView以及其子类。
头部伴随模糊效果放大缩小,并在一定位置时悬停充当导航栏。这里提供实现思路,如有符合可直接使用。
效果如下图。
实现:
首先分解为两部分,一部分为头部视图,一部分为滚动视图。头部视图负责展示,滚动视图负责控制头部视图如何展示,比如放大和缩小。
一:头部视图
头部视图拆解为负责展示图片的UIImageView,负责模糊效果的UIVisualEffectView,负责标题显示的UILabel,以及返回等功能按钮的UIButton。
进一步分析,模糊效果的视图应该和展示图片的视图做同样的处理,同样的缩放,为了更好的控制将其包装到一containView中。跟据滚动的位置改变containView的大小,模糊视图根据滚动的位置改变模糊的程度。标题视图在滚动视图到达一定位置时出现并停在那里。这里利用UIImageView的特性,改变它的contentMode为UIViewContentModeScaleAspectFill,这样只用简单的改变图片视图的高度时就能营造放大缩小的效果了。
UIImageView部分代码
_blurImageView = [[UIImageView alloc] init];
_blurImageView.clipsToBounds = YES;
_blurImageView.autoresizingMask = UIViewAutoresizingFlexibleHeight | UIViewAutoresizingFlexibleWidth;
_blurImageView.contentMode = UIViewContentModeScaleAspectFill;
[self addSubview:_blurImageView];
UIVisualEffectView部分代码
UIBlurEffect *beffect = [UIBlurEffect effectWithStyle:UIBlurEffectStyleLight];
 _imageEffectView = [[UIVisualEffectView alloc]initWithEffect:beffect];
 _imageEffectView.alpha = 0;
_imageEffectView.autoresizingMask = UIViewAutoresizingFlexibleHeight | UIViewAutoresizingFlexibleWidth;
 [self addSubview:_imageEffectView];
二:滚动视图
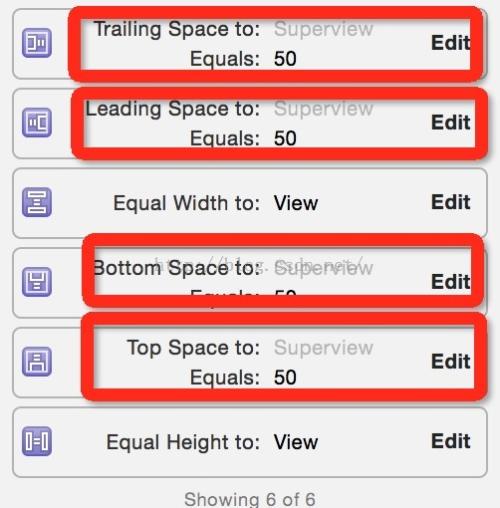
滚动视图需要做的就是设置 contentInset ,让出一部分空间给头部视图。这里如果将头部视图直接加到滚动视图上,无法做到头部视图最后悬停在一定位置,因此直接加到和滚动视图同级就行。
示例代码
self.webView = [[WKWebView alloc] initWithFrame:CGRectMake(0, 0, kWindowWidth, kWindowHeight)];
    self.webView.backgroundColor = [UIColor clearColor];
    [self.view addSubview:self.webView];

    NSURL * url = [NSURL URLWithString:@"https://yongliangp.github.io/"];
    NSMutableURLRequest *re = [NSMutableURLRequest requestWithURL:url];
    [self.webView loadRequest:re];

    //初始化header
    self.headerView.headerImage = [UIImage imageNamed:@"saber.jpeg"];
    self.headerView.tittle = @"哈哈是个demo";
    self.headerView.isShowLeftButton = YES;
    self.headerView.isShowRightButton = YES;
    __weak typeof(self) weakSelf = self;
    self.headerView.leftClickBlock = ^(UIButton *btn){
        [weakSelf.navigationController popViewControllerAnimated:YES];
    };
    self.headerView.rightClickBlock  = ^(UIButton *btn){
        NSLog(@"点击了分享");
    };

    [self.webView.scrollView handleSpringHeadView:self.headerView];
三:控制头部动画
和其他的滚动视图做动画一样,实现滚动视图的代理方法scrollViewDidScroll,获取偏移量,然后根据一定的规则做动画,这里为了解耦,也为了复用,使用了在scrollView的分类中监听scrollView的contentOffset方法去实现动画控制。
首先确定两个临界点:视图的初始高度 悬停的高度。
示例代码(简单控制)
- (void)yl_scrollViewDidScroll:(UIScrollView *)scrollView
{

    CGFloat offsetY = scrollView.contentOffset.y;

    if (offsetY>=-kNavHeight)
    {
        offsetY=-kNavHeight;

        if (self.headerView.frame.size.height!=kNavHeight)
        {
            self.headerView.frame = CGRectMake(0, 0, self.headerView.bounds.size.width, kNavHeight);
            [UIView animateWithDuration:0.25 animations:^{
                self.titleLabel.frame = CGRectMake(35, 20, self.bounds.size.width-35*2, 44);
                self.titleLabel.alpha = 1;
            }];
        }

    }else
    {
        self.headerView.frame = CGRectMake(0, 0, self.headerView.bounds.size.width, -offsetY);
        if (self.titleLabel.alpha!=0)
        {
            [UIView animateWithDuration:0.25 animations:^{
                self.titleLabel.frame = CGRectMake(35, 40, self.bounds.size.width-35*2, 44);
                self.titleLabel.alpha = 0;
            }];

        }

    }

    CGFloat alpha ;

    if (self.headerView.frame.size.height>=kWindowWidth/2)
    {
        alpha = 0;

    }else
    {
        alpha = 1-((self.headerView.frame.size.height-kNavHeight)/(kWindowWidth/2-kNavHeight));
    }

    if (alpha>=0&&alpha<=1)
    {
        self.headerEffectView.alpha = alpha;
    }


}
最重要的,记得在控制器dealloc时移除监听者
最重要的,记得在控制器dealloc时移除监听者
最重要的,记得在控制器dealloc时移除监听者
或者你有更好的方式移除监听者请告诉我。
照例放Demo,仅供参考Demo地址:
https://github.com/yongliangP/YLSpringHeader
用心良苦请 star
如果你觉得对你有帮助请点 喜欢 哦,也可以关注 我,不定时更新(虽然现在不能保证更新量了,但会一直更)。
作者:iceMaple
链接:https://www.jianshu.com/p/5d92a64888d0
更多推荐: