实战▍一个完整的电信客服分析平台大数据项目:架构、实现、数据

编者按:
很难见到这种一个完整的大数据项目,从项目背景、项目架构到项目实现都有大量的实例,包括数据存储和数据采集和各个模块的运行设置等等。
通信运营商的数据量存储量是最多的,也是数据化较为完善的领域,数据价值也非常高,如何从电信运营商的数据里「挖掘」到金子?如何把数据转化为生产力是电信运营商最为紧迫的需求,相信这篇干货满满的文章能够给你带来新的思路。
文章目录
一、项目背景
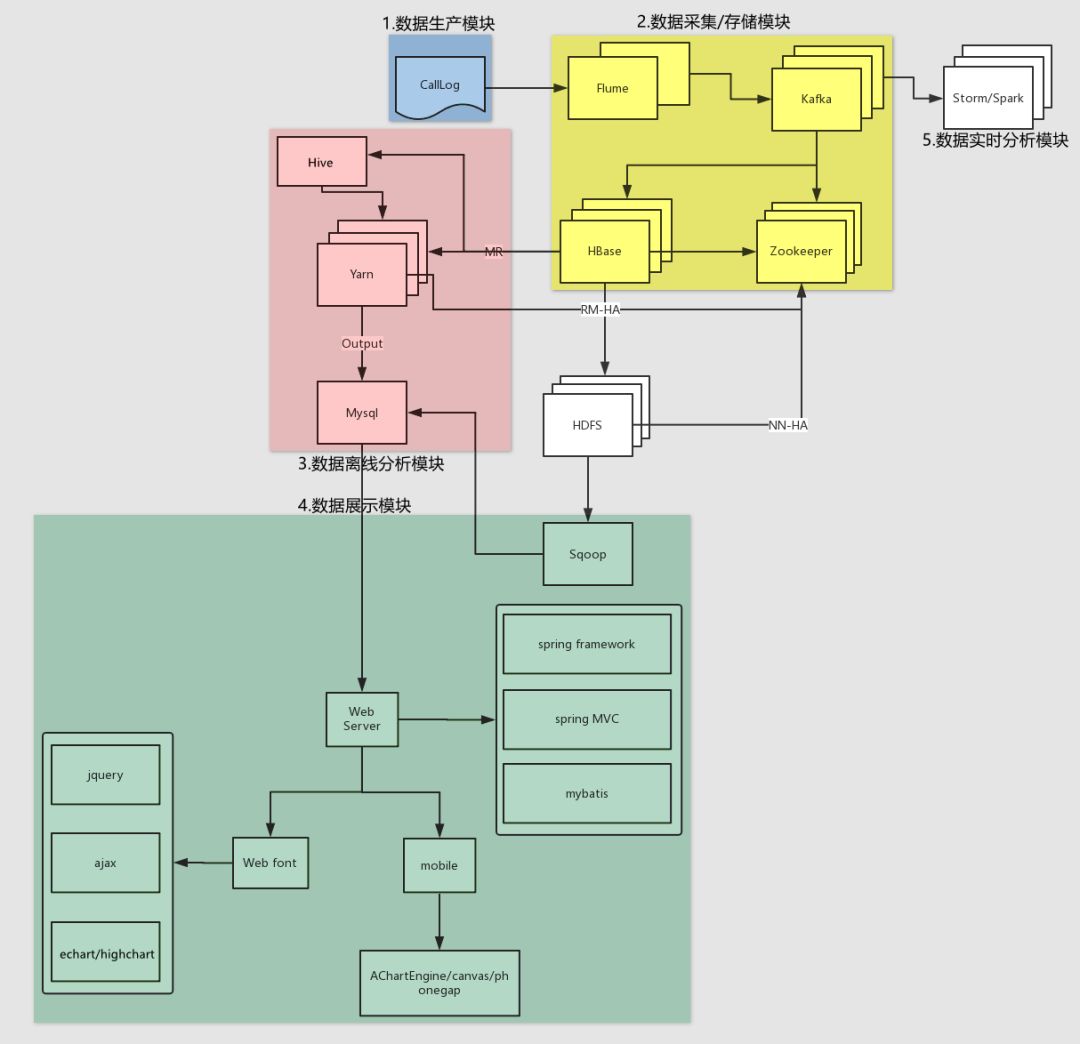
二、项目架构
三、项目实现
3.1、数据生产
3.1.1、数据结构
3.1.2、编写代码
3.1.3、打包测试
3.2、数据采集/消费(存储)
3.2.1、数据采集:采集实时产生的数据到 kafka 集群
3.2.2、编写代码:数据消费(HBase)
3.2.3、编写测试单元:范围查找数据(本方案已弃用,但需掌握)
3.2.4、运行测试:HBase 消费数据
3.2.5、编写代码:优化数据存储方案
3.2.6、运行测试:协处理器
3.2.7、编写测试单元:范围查找数据


通信运营商每时每刻会产生大量的通信数据,例如:通话记录,短信记录,彩信记录,第三方服务资费等等繁多信息。数据量如此巨大,除了要满足用户的实时查询和展示之外,还需要定时定期的对已有数据进行离线的分析处理。例如:当日话单,月度话单,季度话单,年度话单,通话详情,通话记录等等。我们以此为背景,寻找一个切入点,学习其中的方法论。
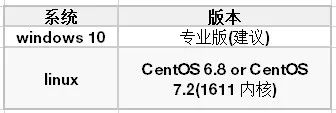
系统环境:
开发工具:
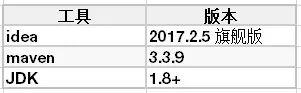
尖叫提示:idea2017.2.5 必须使用 maven3.3.9,不要使用 maven3.5,有部分兼容性问题。
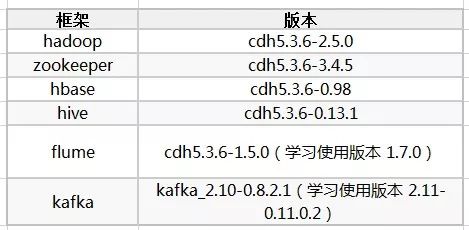
集群环境(CDH版):
尖叫提示:学习的时候使用的普通版本的,企业开发中使用的是 CDH 版本的。
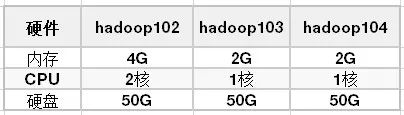
硬件环境:
此情此景,对于该模块的业务,即数据生产过程,一般并不会让你来进行操作,数据生产是一套完整且严密的体系,这样可以保证数据的鲁棒性。但是如果涉及到项目的一体化方案的设计(数据的产生、存储、分析、展示),则必须清楚每一个环节是如何处理的,包括其中每个环境可能隐藏的问题;数据结构,数据内容可能出现的问题。
我们将在 HBase 中存储两个电话号码,以及通话建立的时间和通话持续时间,最后再加上一个 flag 作为判断第一个电话号码是否为主叫。姓名字段的存储我们可以放置于另外一张表做关联查询,当然也可以插入到当前表中。如下图所示:
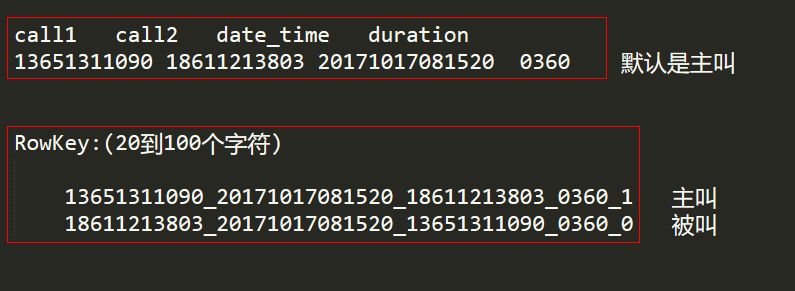
数据结构如下:

思路:
a) 创建 Java 集合类存放模拟的电话号码和联系人;
b) 随机选取两个手机号码当做“主叫”与“被叫”(注意判断两个手机号不能重复),产出 call1 与 call2 字段数据;
c) 创建随机生成通话建立时间的方法,可指定随机范围,最后生成通话建立时间,产出 date_time 字段数据;
d) 随机一个通话时长,单位:秒,产出 duration 字段数据;
e) 将产出的一条数据拼接封装到一个字符串中;
f) 使用 IO 操作将产出的一条通话数据写入到本地文件中。(一定要手动 flush,这样能确保每条数据写入到文件一次)
新建 module 项目:ct_producer
pom.xml 文件配置
<properties><project.build.sourceEncoding>UTF-8</project.build.sourceEncoding></properties><dependencies><!-- https://mvnrepository.com/artifact/junit/junit --><dependency><groupId>junit</groupId><artifactId>junit</artifactId><version>4.12</version><scope>test</scope></dependency></dependencies><build><plugins><plugin><groupId>org.apache.maven.plugins</groupId><artifactId>maven-surefire-plugin</artifactId><version>2.12.4</version><configuration><!-- 设置打包时跳过test包里面的代码 --><skipTests>true</skipTests></configuration></plugin></plugins></build>
1) 随机输入一些手机号码以及联系人,保存于 Java 的集合中。
新建类:ProductLog
/*** @author chenmingjun* 2019-03-13 13:35*/public class ProductLog {/*** 生产数据*/private String startTime = "2017-01-01";private String endTime = "2017-12-31";// 用于存放待随机的联系人电话private List<String> phoneList = new ArrayList<>();// 用于存放联系人电话与姓名的映射private Map<String, String> phoneNameMap = new HashMap<>();/*** 初始化随机的电话号码和姓名*/public void initPhone() {phoneList.add("13242820024");phoneList.add("14036178412");phoneList.add("16386074226");phoneList.add("13943139492");phoneList.add("18714767399");phoneList.add("14733819877");phoneList.add("13351126401");phoneList.add("13017498589");phoneList.add("16058589347");phoneList.add("18949811796");phoneList.add("13558773808");phoneList.add("14343683320");phoneList.add("13870632301");phoneList.add("13465110157");phoneList.add("15382018060");phoneList.add("13231085347");phoneList.add("13938679959");phoneList.add("13779982232");phoneList.add("18144784030");phoneList.add("18637946280");phoneNameMap.put("13242820024", "李雁");phoneNameMap.put("14036178412", "卫艺");phoneNameMap.put("16386074226", "仰莉");phoneNameMap.put("13943139492", "陶欣悦");phoneNameMap.put("18714767399", "施梅梅");phoneNameMap.put("14733819877", "金虹霖");phoneNameMap.put("13351126401", "魏明艳");phoneNameMap.put("13017498589", "华贞");phoneNameMap.put("16058589347", "华啟倩");phoneNameMap.put("18949811796", "仲采绿");phoneNameMap.put("13558773808", "卫丹");phoneNameMap.put("14343683320", "戚丽红");phoneNameMap.put("13870632301", "何翠柔");phoneNameMap.put("13465110157", "钱溶艳");phoneNameMap.put("15382018060", "钱琳");phoneNameMap.put("13231085347", "缪静欣");phoneNameMap.put("13938679959", "焦秋菊");phoneNameMap.put("13779982232", "吕访琴");phoneNameMap.put("18144784030", "沈丹");phoneNameMap.put("18637946280", "褚美丽");}
2) 创建随机生成通话时间的方法:randomBuildTime()
该时间生成后的格式为:yyyy-MM-dd HH:mm:ss,并使之可以根据传入的起始时间和结束时间来随机生成。
/*** 根据传入的时间区间,在此范围内随机产生通话建立的时间* 公式:startDate.getTime() + (endDate.getTime() - startDate.getTime()) * Math.random()** @param startTime* @param endTime* @return*/public String randomBuildTime(String startTime, String endTime) {try {SimpleDateFormat sdf1 = new SimpleDateFormat("yyyy-MM-dd");Date startDate = sdf1.parse(startTime);Date endDate = sdf1.parse(endTime);if (endDate.getTime() <= startDate.getTime()) {return null;}long randomTS = startDate.getTime() + (long) ((endDate.getTime() - startDate.getTime()) * Math.random());Date resultDate = new Date(randomTS);SimpleDateFormat sdf2 = new SimpleDateFormat("yyyy-MM-dd HH:mm:ss");String resultTimeString = sdf2.format(resultDate);return resultTimeString;} catch (ParseException e) {e.printStackTrace();}return null;}
3) 创建生产日志一条日志的方法:productLog()
随机抽取两个电话号码,随机产生通话建立时间,随机通话时长,将这几个字段拼接成一个字符串,然后return,便可以产生一条通话的记录。需要注意的是,如果随机出的两个电话号码一样,需要重新随机(随机过程可优化,但并非此次重点)。通话时长的随机为30分钟以内,即:60秒 * 30,并格式化为4位数字,例如:0600(10分钟)。
/*** 生产数据的形式:13651311090,18611213803,2017-10-17 08:15:20,0360*/public String productLog() {String caller = null;String callee = null;String callerName = null;String calleeName = null;// 随机获取主叫手机号int callerIndex = (int) (Math.random() * phoneList.size()); // [0, 20)caller = phoneList.get(callerIndex);callerName = phoneNameMap.get(caller);// 随机获取被叫手机号while (true) {int calleeIndex = (int) (Math.random() * phoneList.size()); // [0, 20)callee = phoneList.get(calleeIndex);calleeName = phoneNameMap.get(callee);if (!caller.equals(callee)) {break;}}// 随机获取通话建立的时间String buildTime = randomBuildTime(startTime, endTime);// 随机获取通话的时长DecimalFormat df = new DecimalFormat("0000");String duration = df.format((int) (30 * 60 * Math.random()));StringBuilder sb = new StringBuilder();sb.append(caller + ",").append(callee + ",").append(buildTime + ",").append(duration);return sb.toString();// System.out.println(caller + "," + callerName + "," + callee + "," + calleeName + "," + buildTime + "," + duration);}
4) 创建写入日志方法:writeLog()
productLog() 方法每产生一条日志,便将日志写入到本地文件中,所以建立一个专门用于日志写入的方法,需要涉及到 IO 操作,需要注意的是,输出流每次写一条日之后需要 flush,不然可能导致积攒多条数据才输出一次。最后需要将 productLog() 方法放置于 while 死循环中执行。
/*** 将数据写入到文件中*/public void writeLog(String filePath) {try {OutputStreamWriter osw = new OutputStreamWriter(new FileOutputStream(filePath), "UTF-8");while (true) {Thread.sleep(200);String log = productLog();System.out.println(log);osw.write(log + "\n");osw.flush(); // 一定要手动flush,这样能确保每条数据写入到文件一次}} catch (IOException e) {e.printStackTrace();} catch (InterruptedException e) {e.printStackTrace();}}
5) 在主函数中初始化以上逻辑,并测试:
public static void main(String[] args) throws InterruptedException {if (args == null || args.length <= 0) {System.out.println("No arguments");return;}ProductLog productLog = new ProductLog();productLog.initPhone();productLog.writeLog(args[0]);// 测试// String logPath = "d:\\temp\\ct_log\\log.csv";// productLog.writeLog(logPath);}
3.1.3、打包测试
1) 打包方式
如果在 eclipse 中,则需要如下 maven 参数进行打包:
-P local clean package:不打包第三方依赖-P dev clean package install:打包第三方依赖
如果在 idea 中,则需要在 maven project 视图中一次选择如下按钮进行打包:详细操作请参看课堂演示:
LifeCycle --> package(双击)分别在 Windows 上和 Linux 中进行测试:
Windows:java -cp ct_producer-1.0-SNAPSHOT.jar producer.ProductLog /本地目录/callLog.csv
2) 为日志生成任务编写 bash 脚本:productLog.sh,文件内容如下,该文件放在 /opt/module/flume/job/ct/ 目录下,并授予执行权限。
#!/bin/bashjava -cp /opt/module/flume/job/ct/ct_producer-1.0-SNAPSHOT.jar com.china.producer.ProductLog /opt/module/flume/job/ct/calllog.csv
欢迎来到数据采集模块(消费),在企业中你要清楚流式数据采集框架 flume 和 kafka 的定位是什么。我们在此需要将实时数据通过 flume 采集到 kafka 然后供给给 hbase 消费。
flume:Cloudera 公司研发
适合采集文件中的数据;
适合下游数据消费者不多的情况;
适合数据安全性要求不高的操作;
适合与 Hadoop 生态圈对接的操作。
kafka:Linkedin 公司研发
适合数据下游消费众多的情况;
适合数据安全性要求较高的操作(支持 replication(副本))。
HBase:实时保存一条一条流入的数据(万金油)
情景:
适用于在线业务
适用于离线业务
适用于非结构化数据
适用于结构化数据
因此我们常用的一种模型是:
线上数据 --> flume --> kafka --> flume(根据情景增删该流程) --> HDFS (最常用)
线上数据 --> flume --> kafka --> 根据kafka的API自己写 --> HDFS
线上数据 --> kafka --> HDFS
线上数据 --> kafka --> Spark/Storm
消费存储模块流程图:

公司中的业务情景:
1、公司已经设计好架构了,耐心了解每一个框架应对的是哪一个业务的功能,之后按照框架进行分层。
2、公司没有架构,需要自己搭建,需要按照客户的需求,先对需求进行分层,根据需求用对应的框架实现,之后对框架进行分层。(架构师的思想:宏观格局,5万的月薪,这样才刺激!)
思路:
a) 配置 kafka,启动 zookeeper 和 kafka 集群;
b) 创建 kafka 主题;
c) 启动 kafka 控制台消费者(此消费者只用于测试使用);
d) 配置 flume,监控日志文件;
e) 启动 flume 监控任务;
f) 运行日志生产脚本;
g) 观察测试。
1) 配置 kafka
使用新版本 kafka_2.11-0.11.0.2,不使用老版本 kafka_2.10-0.8.2.1。
新旧版本的区别:
新:能配置 delete.topic.enable=true 删除topic功能使能,老版本没有,不过配置了也生效。
旧:需要配置 port=9092,host.name=hadoop102,新版本的不需要。
新:设置读取偏移地址的位置 auto.offset.reset 默认值是 latest,还可以填写 earliest。
旧:设置读取偏移地址的位置 auto.offset.reset 默认值是 largest,还可以填写 smallest。
server.properties
############################# Server Basics ############################## The id of the broker. This must be set to a unique integer for each broker.broker.id=0# Switch to enable topic deletion or not, default value is false(此处的配置打开)delete.topic.enable=true############################# Socket Server Settings ############################## The address the socket server listens on. It will get the value returned from# java.net.InetAddress.getCanonicalHostName() if not configured.# FORMAT:# listeners = listener_name://host_name:port# EXAMPLE:# listeners = PLAINTEXT://your.host.name:9092#listeners=PLAINTEXT://:9092# Hostname and port the broker will advertise to producers and consumers. If not set,# it uses the value for "listeners" if configured. Otherwise, it will use the value# returned from java.net.InetAddress.getCanonicalHostName().#advertised.listeners=PLAINTEXT://your.host.name:9092# Maps listener names to security protocols, the default is for them to be the same. See the config documentation for more details#listener.security.protocol.map=PLAINTEXT:PLAINTEXT,SSL:SSL,SASL_PLAINTEXT:SASL_PLAINTEXT,SASL_SSL:SASL_SSL# The number of threads that the server uses for receiving requests from the network and sending responses to the networknum.network.threads=3# The number of threads that the server uses for processing requests, which may include disk I/Onum.io.threads=8# The send buffer (SO_SNDBUF) used by the socket serversocket.send.buffer.bytes=102400# The receive buffer (SO_RCVBUF) used by the socket serversocket.receive.buffer.bytes=102400# The maximum size of a request that the socket server will accept (protection against OOM)socket.request.max.bytes=104857600############################# Log Basics ############################## A comma seperated list of directories under which to store log files (此处的配置写具体的路径)# log.dirs=/tmp/kafka-logslog.dirs=/opt/module/kafka/logs# The default number of log partitions per topic. More partitions allow greater# parallelism for consumption, but this will also result in more files across# the brokers.num.partitions=1# The number of threads per data directory to be used for log recovery at startup and flushing at shutdown.# This value is recommended to be increased for installations with data dirs located in RAID array.num.recovery.threads.per.data.dir=1############################# Internal Topic Settings ############################## The replication factor for the group metadata internal topics "__consumer_offsets" and "__transaction_state"# For anything other than development testing, a value greater than 1 is recommended for to ensure availability such as 3.offsets.topic.replication.factor=1transaction.state.log.replication.factor=1transaction.state.log.min.isr=1############################# Log Flush Policy ############################## Messages are immediately written to the filesystem but by default we only fsync() to sync# the OS cache lazily. The following configurations control the flush of data to disk.# There are a few important trade-offs here:# 1. Durability: Unflushed data may be lost if you are not using replication.# 2. Latency: Very large flush intervals may lead to latency spikes when the flush does occur as there will be a lot of data to flush.# 3. Throughput: The flush is generally the most expensive operation, and a small flush interval may lead to exceessive seeks.# The settings below allow one to configure the flush policy to flush data after a period of time or# every N messages (or both). This can be done globally and overridden on a per-topic basis.# The number of messages to accept before forcing a flush of data to disk#log.flush.interval.messages=10000# The maximum amount of time a message can sit in a log before we force a flush#log.flush.interval.ms=1000############################# Log Retention Policy ############################## The following configurations control the disposal of log segments. The policy can# be set to delete segments after a period of time, or after a given size has accumulated.# A segment will be deleted whenever *either* of these criteria are met. Deletion always happens# from the end of the log.# The minimum age of a log file to be eligible for deletion due to agelog.retention.hours=168# A size-based retention policy for logs. Segments are pruned from the log as long as the remaining# segments don't drop below log.retention.bytes. Functions independently of log.retention.hours.#log.retention.bytes=1073741824# The maximum size of a log segment file. When this size is reached a new log segment will be created.log.segment.bytes=1073741824# The interval at which log segments are checked to see if they can be deleted according# to the retention policieslog.retention.check.interval.ms=300000############################# Zookeeper ############################## Zookeeper connection string (see zookeeper docs for details).# This is a comma separated host:port pairs, each corresponding to a zk# server. e.g. "127.0.0.1:3000,127.0.0.1:3001,127.0.0.1:3002".# You can also append an optional chroot string to the urls to specify the# root directory for all kafka znodes.# zookeeper.connect=localhost:2181 (此处的配置写集群的地址)zookeeper.connect=hadoop102:2181,hadoop103:2181,hadoop104:2181# Timeout in ms for connecting to zookeeper(此处的时间配置大一些)zookeeper.connection.timeout.ms=60000############################# Group Coordinator Settings ############################## The following configuration specifies the time, in milliseconds, that the GroupCoordinator will delay the initial consumer rebalance.# The rebalance will be further delayed by the value of group.initial.rebalance.delay.ms as new members join the group, up to a maximum of max.poll.interval.ms.# The default value for this is 3 seconds.# We override this to 0 here as it makes for a better out-of-the-box experience for development and testing.# However, in production environments the default value of 3 seconds is more suitable as this will help to avoid unnecessary, and potentially expensive, rebalances during application startup.group.initial.rebalance.delay.ms=0
配置环境变量,并使得配置后的环境变量生效
[atguigu@hadoop102 module]$ sudo vim /etc/profile#KAFKA_HOMEexport KAFKA_HOME=/opt/module/kafkaexport PATH=$PATH:$KAFKA_HOME/bin[atguigu@hadoop102 module]$ source /etc/profile
分发安装包或者同步复制到 hadoop103 和 hadoop104
[atguigu102 module]$ xsync /opt/module/kafka/或者[atguigu102 module]$ scp -r /opt/module/kafka/ hadoop103:/opt/module/[atguigu102 module]$ scp -r /opt/module/kafka/ hadoop104:/opt/module/
注意:分发之后记得配置其他机器的环境变量。
分别在 hadoop103 和 hadoop104 上修改配置文件 /opt/module/kafka/config/server.properties 中的 broker.id=1、broker.id=2
注意:broker.id 不得重复。
2) 先启动 zookeeper 集群 (kafka 集群 依赖于 zookeeper 集群),再启动 kafka 集群(即启动 3 台 kafka 的 broker 服务)
[atguigu@hadoop102 kafka]$ /opt/module/kafka/bin/kafka-server-start.sh /opt/module/kafka/config/server.properties &[atguigu@hadoop103 kafka]$ /opt/module/kafka/bin/kafka-server-start.sh /opt/module/kafka/config/server.properties &[atguigu@hadoop104 kafka]$ /opt/module/kafka/bin/kafka-server-start.sh /opt/module/kafka/config/server.properties &
3) 创建 kafka 主题
$ /opt/module/kafka/bin/kafka-topics.sh --zookeeper hadoop102:2181 \--create --replication-factor 1 --partitions 3 --topic calllog
检查一下是否创建主题成功:
$ /opt/module/kafka/bin/kafka-topics.sh --zookeeper hadoop102:2181 --list删除topic
$ /opt/module/kafka/bin/kafka-topics.sh --zookeeper hadoop102:2181 \--delete --topic calllog
注意:需要 server.properties 中设置 delete.topic.enable=true 否则只是标记删除或者直接重启。
4) 启动 kafka 控制台消费者,等待 flume 信息的输入
$ /opt/module/kafka/bin/kafka-console-consumer.sh --zookeeper hadoop102:2181 \--topic calllog --from-beginning
5) 配置 flume(flume-kafka.conf)
在 hadoop102 的 /opt/module/flume/job 目录下创建一个 ct 文件夹,进入该文件夹,创建一个文件 flume-kafka.conf,文件内容如下:
# definea1.sources = r1a1.sinks = k1a1.channels = c1# sourcea1.sources.r1.type = execa1.sources.r1.command = tail -F -c +0 /opt/module/flume/job/ct/calllog.csva1.sources.r1.shell = /bin/bash -c# sinka1.sinks.k1.type = org.apache.flume.sink.kafka.KafkaSinka1.sinks.k1.kafka.bootstrap.servers = hadoop102:9092,hadoop103:9092,hadoop104:9092a1.sinks.k1.kafka.topic = callloga1.sinks.k1.kafka.flumeBatchSize = 20a1.sinks.k1.kafka.producer.acks = 1a1.sinks.k1.kafka.producer.linger.ms = 1# channela1.channels.c1.type = memorya1.channels.c1.capacity = 1000a1.channels.c1.transactionCapacity = 100# binda1.sources.r1.channels = c1a1.sinks.k1.channel = c1
注意:需要使用新版本的 flume 的配置文件参考案列。(版本:apache-flume-1.7.0)
6) 进入 flume 根目录下,启动 flume
$ bin/flume-ng agent --conf conf/ --name a1 --conf-file ./job/ct/flume-kafka.conf7) 运行生产日志的任务脚本,观察 kafka 控制台消费者是否成功显示产生的数据
$ sh productlog.sh如果以上操作均成功,则开始编写操作 HBase 的代码,用于消费数据,将产生的数据实时存储在 HBase 中。
思路:
a) 编写 kafka 消费者(使用新API),读取 kafka 集群中缓存的消息,并打印到控制台以观察是否成功;
b) 既然能够读取到 kafka 中的数据了,就可以将读取出来的数据写入到 HBase 中,所以编写调用 HBase API 相关方法,将从 Kafka 中读取出来的数据写入到 HBase;
c) 以上两步已经足够完成消费数据,存储数据的任务,但是涉及到解耦,所以过程中需要将一些属性文件外部化,HBase 通用性方法封装到某一个类中。
创建新的 module 项目:ct_consumer
pom.xml 文件配置:
<?xml version="1.0" encoding="UTF-8"?><project xmlns="http://maven.apache.org/POM/4.0.0"xmlns:xsi="http://www.w3.org/2001/XMLSchema-instance"xsi:schemaLocation="http://maven.apache.org/POM/4.0.0 http://maven.apache.org/xsd/maven-4.0.0.xsd"><modelVersion>4.0.0</modelVersion><groupId>com.china</groupId><artifactId>ct_consumer</artifactId><version>1.0-SNAPSHOT</version><dependencies><!-- https://mvnrepository.com/artifact/junit/junit --><dependency><groupId>junit</groupId><artifactId>junit</artifactId><version>4.12</version><scope>test</scope></dependency><!-- https://mvnrepository.com/artifact/org.apache.kafka/kafka-clients --><dependency><groupId>org.apache.kafka</groupId><artifactId>kafka-clients</artifactId><version>0.11.0.2</version></dependency><!-- https://mvnrepository.com/artifact/org.apache.hbase/hbase-client --><dependency><groupId>org.apache.hbase</groupId><artifactId>hbase-client</artifactId><version>1.3.1</version></dependency><!-- https://mvnrepository.com/artifact/org.apache.hbase/hbase-server --><dependency><groupId>org.apache.hbase</groupId><artifactId>hbase-server</artifactId><version>1.3.1</version></dependency></dependencies><build><plugins><plugin><groupId>org.apache.maven.plugins</groupId><artifactId>maven-surefire-plugin</artifactId><version>2.12.4</version><configuration><!-- 设置打包时跳过test包里面的代码 --><skipTests>true</skipTests></configuration></plugin></plugins></build></project>
1) 新建类:HBaseConsumer
该类主要用于读取 kafka 中缓存的数据,然后调用 HBase API,持久化数据。
package com.china.kafka;import com.china.hbase.HBaseDao;import com.china.utils.PropertiesUtil;import org.apache.kafka.clients.consumer.ConsumerRecord;import org.apache.kafka.clients.consumer.ConsumerRecords;import org.apache.kafka.clients.consumer.KafkaConsumer;import java.util.Arrays;/*** @author chenmingjun* 2019-03-14 20:38*/public class HBaseConsumer {public static void main(String[] args) {// 编写 kafka 消费者,读取 kafka 集群中缓存的消息,并打印到控制台以观察是否成功KafkaConsumer<String, String> kafkaConsumer = new KafkaConsumer<>(PropertiesUtil.properties);kafkaConsumer.subscribe(Arrays.asList(PropertiesUtil.getProperty("kafka.topics")));HBaseDao hBaseDao = new HBaseDao();while (true) {// 读取数据,读取超时时间为100msConsumerRecords<String, String> records = kafkaConsumer.poll(100);for (ConsumerRecord<String, String> record : records) {// 测试System.out.println(record.value());// 将从 Kafka 中读取出来的数据写入到 HBaseString oriValue = record.value();hBaseDao.put(oriValue);}}}}
2) 新建类:PropertiesUtil
该类主要用于将常用的项目所需的参数外部化,解耦,方便配置。
package com.china.utils;import java.io.IOException;import java.io.InputStream;import java.util.Properties;/*** @author chenmingjun* 2019-03-14 23:22*/public class PropertiesUtil {public static Properties properties = null;static {// 加载配置文件的属性InputStream is = ClassLoader.getSystemResourceAsStream("kafka.properties");properties = new Properties();try {properties.load(is);} catch (IOException e) {e.printStackTrace();}}public static String getProperty(String key) {return properties.getProperty(key);}}
3) 创建 kafka.properties 文件,并放置于 resources 目录下
# 设置 kafka 服务的地址,不需要将所有 broker 指定上bootstrap.servers=hadoop102:9092,hadoop103:9092,hadoop104:9092# 设置消费者所属的消费者组group.id=hbase_consumer_group# 设置是否自动确认 offsetenable.auto.commit=true# 设置自动确认 offset 的时间间隔auto.commit.interval.ms=30000# 设置 key 和 value 的反序列化类的全类名key.deserializer=org.apache.kafka.common.serialization.StringDeserializervalue.deserializer=org.apache.kafka.common.serialization.StringDeserializer########## 以下为自定义的属性设置########### 设置本次消费的主题kafka.topics=calllog# 设置 HBase 的一些变量hbase.calllog.namespace=ns_cthbase.calllog.tableName=ns_ct:callloghbase.calllog.regions.count=6
4) 将 hdfs-site.xml、core-site.xml、hbase-site.xml、log4j.properties 放置于 resources 目录
5) 新建类:HBaseUtil
该类主要用于封装一些 HBase 的常用操作,比如:创建命名空间、创建表等等。
package com.china.utils;import org.apache.hadoop.conf.Configuration;import org.apache.hadoop.hbase.HColumnDescriptor;import org.apache.hadoop.hbase.HTableDescriptor;import org.apache.hadoop.hbase.NamespaceDescriptor;import org.apache.hadoop.hbase.TableName;import org.apache.hadoop.hbase.client.Admin;import org.apache.hadoop.hbase.client.Connection;import org.apache.hadoop.hbase.client.ConnectionFactory;import org.apache.hadoop.hbase.util.Bytes;import java.io.IOException;import java.text.DecimalFormat;import java.util.Iterator;import java.util.TreeSet;/*** @author chenmingjun* 2019-03-15 12:26*/public class HBaseUtil {/*** 判断 HBase 表是否存在(使用新 HBase 的 API)* 小知识:当前代码块对该异常没有处理能力(业务处理能力)的时候,我们就要抛出去。** @param conf HBaseConfiguration* @param tableName* @return*/public static boolean isExistTable(Configuration conf, String tableName) throws IOException {Connection conn = ConnectionFactory.createConnection(conf);Admin admin = conn.getAdmin();boolean result = admin.tableExists(TableName.valueOf(tableName));admin.close();conn.close();return result;}/*** 初始化命名空间** @param conf* @param namespace*/public static void initNamespace(Configuration conf, String namespace) throws IOException {Connection conn = ConnectionFactory.createConnection(conf);Admin admin = conn.getAdmin();// 命名空间类似于关系型数据库中的 schema,可以想象成文件夹// 创建命名空间描述器NamespaceDescriptor nd = NamespaceDescriptor.create(namespace).addConfiguration("CREATE_TIME", String.valueOf(System.currentTimeMillis())).addConfiguration("AUTHOR", "chenmingjun").build();admin.createNamespace(nd);admin.close();conn.close();}/*** 创建表+预分区键** @param conf* @param tableName* @param regions* @param columnFamily* @throws IOException*/public static void creatTable(Configuration conf, String tableName, int regions, String... columnFamily) throws IOException {Connection conn = ConnectionFactory.createConnection(conf);Admin admin = conn.getAdmin();if (isExistTable(conf, tableName)) {System.out.println("表 " + tableName + " 已存在!");return;}// 创建表描述器(即通过表名实例化表描述器)HTableDescriptor htd = new HTableDescriptor(TableName.valueOf(tableName));// 添加列族for (String cf : columnFamily) {// 创建列族描述器HColumnDescriptor hcd = new HColumnDescriptor(cf);// 可以设置保存的版本个数,默认是1个// hcd.setMaxVersions(3);htd.addFamily(hcd);}// 创建表操作(简单表)// admin.createTable(htd);// 为该表设置协处理器// htd.addCoprocessor("com.china.hbase.CalleeWriteObserver");// 创建表操作(加预分区)admin.createTable(htd, genSplitKeys(regions));System.out.println("表" + tableName + "创建成功!");admin.close();conn.close();}/*** 生成预分区键* 例如:{"00|", "01|", "02|", "03|", "04|", "05|"}** @param regions* @return*/public static byte[][] genSplitKeys(int regions) {// 定义一个存放预分区键的数组String[] keys = new String[regions];// 这里默认不会超过两位数的分区,如果超过,需要变更设计// 假设我们的 region 个数不超过两位数,所以 region 的预分区键我们格式化为两位数字所代表的字符串DecimalFormat df = new DecimalFormat("00");for (int i = 0; i < regions; i++) {// 例如:如果 regions = 6,则:{"00|", "01|", "02|", "03|", "04|", "05|"}keys[i] = df.format(i) + "|";}// 测试// System.out.println(Arrays.toString(keys));byte[][] splitKeys = new byte[regions][];// 生成 byte[][] 类型的预分区键的时候,一定要先保证预分区键是有序的TreeSet<byte[]> treeSet = new TreeSet<>(Bytes.BYTES_COMPARATOR);for (int i = 0; i < regions; i++) {treeSet.add(Bytes.toBytes(keys[i]));}// 将排序好的预分区键放到 splitKeys 中,使用迭代器方式Iterator<byte[]> splitKeysIterator = treeSet.iterator();int index = 0;while (splitKeysIterator.hasNext()) {byte[] b = splitKeysIterator.next();splitKeys[index++] = b;}/*// 测试for (byte[] a : splitKeys) {System.out.println(Arrays.toString(a));}*/return splitKeys;}/*** 生成 RowKey* 形式为:regionCode_call1_buildTime_call2_flag_duration** @param regionCode* @param call1* @param buildTime* @param call2* @param flag* @param duration* @return*/public static String genRowKey(String regionCode, String call1, String buildTime, String call2, String flag, String duration) {StringBuilder sb = new StringBuilder();sb.append(regionCode + "_").append(call1 + "_").append(buildTime + "_").append(call2 + "_").append(flag + "_").append(duration);return sb.toString();}/*** 生成分区号* 手机号:15837312345* 通话建立的时间:2017-01-10 11:20:30 -> 201701** @param call1* @param buildTime* @param regions* @return*/public static String genRegionCode(String call1, String buildTime, int regions) {int len = call1.length();// 取出手机号码后四位String lastPhone = call1.substring(len - 4);// 取出通话建立时间的年月即可,例如:201701String ym = buildTime.replaceAll("-", "").substring(0, 6);// 离散操作1Integer x = Integer.valueOf(lastPhone) ^ Integer.valueOf(ym);// 离散操作2int y = x.hashCode();// 生成分区号操作,与初始化设定的 region 个数求模int regionCode = y % regions;// 格式化分区号DecimalFormat df = new DecimalFormat("00");return df.format(regionCode);}/*public static void main(String[] args) {// 测试生成预分区键// genSplitKeys(6);}*/}
针对于一张表,一台服务器(regionServer)维护2到3个region。
1百万条数据大小50M到100M。假设我们取平均值75M。
1个region维护的数据量是1G到10G。假设我们取1G。1024/75=14百万条数据=1千4百万条数据。
假设数据量有10亿条,那么需要region的数量是:10/0.14=72个。数据量大小大约是72G。
一般而言,我们的region不超过2位数,即一共能有100个region。则能处理的数据量是:100G到1000G。
对于 flume 而言,数据处理速度要小于 50M/s,flume 就会非常稳定,大于 70M/s flume 就会开始丢包,大于 100M/s 的时候 flume 就没法用了,此时需要修改 flume 源码。

6) 新建类:HBaseDAO(完成以下内容后,考虑数据 put 的效率如何优化)
该类主要用于执行具体的保存数据的操作,rowkey 的生成规则等等。
package com.china.hbase;import com.china.utils.HBaseUtil;import com.china.utils.PropertiesUtil;import org.apache.hadoop.conf.Configuration;import org.apache.hadoop.hbase.HBaseConfiguration;import org.apache.hadoop.hbase.TableName;import org.apache.hadoop.hbase.client.Connection;import org.apache.hadoop.hbase.client.ConnectionFactory;import org.apache.hadoop.hbase.client.Put;import org.apache.hadoop.hbase.client.Table;import org.apache.hadoop.hbase.util.Bytes;import java.io.IOException;import java.text.ParseException;import java.text.SimpleDateFormat;/*** @author chenmingjun* 2019-03-15 12:24*/public class HBaseDao {public static Configuration conf;private Connection conn;private Table table;private String namespace;private String tableName;private int regions;private SimpleDateFormat sdf1 = new SimpleDateFormat("yyyy-MM-dd HH:mm:ss");private SimpleDateFormat sdf2 = new SimpleDateFormat("yyyyMMddHHmmss");static {conf = HBaseConfiguration.create();}public HBaseDao() {try {// 获取配置文件namespace = PropertiesUtil.getProperty("hbase.calllog.namespace");tableName = PropertiesUtil.getProperty("hbase.calllog.tableName");regions = Integer.valueOf(PropertiesUtil.getProperty("hbase.calllog.regions.count"));// 实例化 Connection 对象conn = ConnectionFactory.createConnection(conf);// 实例化表对象table = conn.getTable(TableName.valueOf(tableName));if (!HBaseUtil.isExistTable(conf, tableName)) {HBaseUtil.initNamespace(conf, namespace);HBaseUtil.creatTable(conf, tableName, regions, "f1", "f2");}} catch (IOException e) {e.printStackTrace();}}/*** 将当前数据put到HTable中** 原始数据 oriValue 形式:13231085347,18637946280,2017-06-18 20:47:26,0616* RowKey 形式:01_13231085347_20170618204726_18637946280_1_0616* HBase 表的列的形式:call1 call2 build_time build_time_ts flag duration** @param oriValue*/public void put(String oriValue) {try {// 切割原始数据String[] splitOri = oriValue.split(",");// 取值赋值String call1 = splitOri[0];String call2 = splitOri[1];String buildTime = splitOri[2]; // 2017-06-18 20:47:26String duration = splitOri[3];// 将 2017-06-18 20:47:26 转换为 20170618204726String buildTimeRep = sdf2.format(sdf1.parse(buildTime));String flag = "1";// 生成时间戳String buildTime_ts = String.valueOf(sdf1.parse(buildTime).getTime());// 生成分区号String regionCode = HBaseUtil.genRegionCode(call1, buildTime, regions);// 拼接数据,生成 RowKeyString rowKey = HBaseUtil.genRowKey(regionCode, call1, buildTimeRep, call2, flag, duration);// 向 HBase 表中插入该条数据Put callerPut = new Put(Bytes.toBytes(rowKey));callerPut.addColumn(Bytes.toBytes("f1"), Bytes.toBytes("call1"), Bytes.toBytes(call1));callerPut.addColumn(Bytes.toBytes("f1"), Bytes.toBytes("call2"), Bytes.toBytes(call2));callerPut.addColumn(Bytes.toBytes("f1"), Bytes.toBytes("build_time"), Bytes.toBytes(buildTime));callerPut.addColumn(Bytes.toBytes("f1"), Bytes.toBytes("build_time_ts"), Bytes.toBytes(buildTime_ts));callerPut.addColumn(Bytes.toBytes("f1"), Bytes.toBytes("flag"), Bytes.toBytes(flag));callerPut.addColumn(Bytes.toBytes("f1"), Bytes.toBytes("duration"), Bytes.toBytes(duration));table.put(callerPut);// 向 HBase 表中插入数据(被叫)// Put calleePut = new Put(Bytes.toBytes(rowKey));// ......// table.put(calleePut);// 这种方法不好,我们使用协处理器} catch (IOException e) {e.printStackTrace();} catch (ParseException e) {e.printStackTrace();}}}
注意:生成的时间戳要是 string 类型的。不能是 long 类型的。
注意:"xxx".getBytes(); 与 Bytes.toBytes("xxx"); 有区别,
Bytes.toBytes("xxx"); 的底层默认是 "xxx".getBytes(UTF8_CHARSET);,
而 "xxx".getBytes(); 底层默认是 "xxx".getBytes(ISO-8859-1_CHARSET);
二者编码不一样,混着用,就会出现中文乱码!!!
使用 scan 查看 HBase 中是否正确存储了数据,同时尝试使用过滤器查询扫描指定通话时间点的数据。进行该单元测试前,需要先运行数据采集任务,确保 HBase 中已有数据存在。
新建工具过滤器工具类:HBaseFilterUtil
新建单元测试类:HBaseScanTest1(这是个当前情景被废弃的方案,现用方案:HBaseScanTest2 后续讲解)
尖叫提示:请将 Linux 允许打开的文件个数和进程数进行优化,优化 RegionServer 与 Zookeeper 会话的超时时间。
项目成功后,则将项目打包后在 linux 中运行测试。
1) 打包 HBase 消费者代码
a) 在 windows 中,进入工程的 pom.xml 所在目录下(建议将该工程的 pom.xml 文件拷贝到其他临时目录中,例如我把 pom.xml 文件拷贝到了 C:\Users\bruce\Desktop\maven-lib 目录下),然后使用 mvn 命令下载工程所有依赖的 jar 包
mvn -DoutputDirectory=C:\Users\bruce\Desktop\maven-lib\lib -DgroupId=com.china -DartifactId=ct_consumer -Dversion=1.0-SNAPSHOT dependency:copy-dependenciesb) idea 中使用 maven 打包工程
c) 测试执行该 jar 包(在两种环境下测试)
方案一:推荐使用 * 通配符,将所有依赖加入到 classpath 中,不可使用 *.jar的方式。
尖叫提示:如果是在 Linux 中测试运行,注意文件夹之间的分隔符。自己的工程要单独在 cp 中指定,不要直接放在依赖的 /lib 目录下(即在 Linux 环境下,工程 ct_consumer-1.0-SNAPSHOT.jar 与所依赖的 jar 不能放在同一的目录中)。
当工程 ct_consumer-1.0-SNAPSHOT.jar 与所依赖的 jar 分别放在不同的目录中java -cp C:\Users\bruce\Desktop\maven-lib\ct_consumer-1.0-SNAPSHOT.jar;C:\Users\bruce\Desktop\maven-lib\lib\* com.china.kafka.HBaseConsumer当工程 ct_consumer-1.0-SNAPSHOT.jar 与所依赖的 jar 放在同一的目录中java -cp C:\Users\bruce\Desktop\maven-lib\lib\* com.china.kafka.HBaseConsumer
方案二:最最推荐,使用 java.ext.dirs 参数将所有依赖的目录添加进 classpath 中。
注意:在 Linux 环境下:-Djava.ext.dirs=属性后边的路径必须使用绝对路径。
在 windows 环境下:java -Djava.ext.dirs=C:\Users\bruce\Desktop\maven-lib\lib\ -cp C:\Users\bruce\Desktop\maven-lib\ct_consumer-1.0-SNAPSHOT.jar com.china.kafka.HBaseConsumer在 Linux 环境下:java -Djava.ext.dirs=/opt/module/flume/job/ct/lib/ -cp /opt/module/flume/job/ct/ct_consumer-1.0-SNAPSHOT.jar com.china.kafka.HBaseConsumer
方案三:不推荐,将所有依赖的 jar 包直接以绝对路径的方式添加进 classpath 中,以下 为 windows 中的示例,linux 中需要把分号替换为冒号。
示例部分使用的 CDH 版本的,内容过多,这里不作粘贴了。现在我们要使用 HBase 查找数据时,尽可能的使用 rowKey 去精准的定位数据位置,而非使用 ColumnValueFilter 或者 SingleColumnValueFilter,按照单元格 Cell 中的 Value 过滤数据,这样做在数据量巨大的情况下,效率是极低的!如果要涉及到全表扫描。所以尽量不要做这样可怕的事情。注意,这并非 ColumnValueFilter 就无用武之地。现在,我们将使用协处理器,将数据一分为二。
思路:
a) 编写协处理器类,用于协助处理 HBase 的相关操作(增删改查)。
b) 在协处理器中,一条主叫日志成功插入后,将该日志切换为被叫视角再次插入一次,放入到与主叫日志不同的列族中。
c) 重新创建 hbase 表,并为该表注册协处理器。
d) 编译项目,发布协处理器的 jar 包到 hbase 的 lib 目录下,并群发该 jar 包。
e) 修改 hbase-site.xml 文件,设置协处理器,并群发该 hbase-site.xml 文件。
编码:
1) 新建协处理器类:CalleeWriteObserver,并覆写 postPut() 方法,该方法会在数据成功插入之后被回调
协处理器的使用步骤:
1、编写代码 extends BaseRegionObserver
2、打包jar
3、重新创建表,将表在创建的时候,挂载(注册)该处理器。(如何挂载:即把协处理器的全类名添加到配置)
4、表在挂载协处理器的时候,会去HBase的根目录下的lib目录下的jar包里,找到相应的协处理器类的路径
在执行代码之前,我们先手动删除 hbase 上的表 和 命名空间,命令如下:
disable 'ns_ct:calllog'drop 'ns_ct:calllog'drop_namespace 'ns_ct'
2) 执行代码:重新创建 hbase 表,并为该表注册协处理器。在“表描述器”中调用 addCoprocessor() 方法进行协处理器的设置,大概是这样的:(你需要找到你的建表的那部分代码,添加如下逻辑)
// 为该表设置协处理器htd.addCoprocessor("com.china.hbase.CalleeWriteObserver");
重新编译项目,发布 jar 包到 hbase 的 lib 目录下(注意需群发):
$ scp /opt/module/hbase/lib/ct_consumer-1.0-SNAPSHOT.jar hadoop103:/opt/module/hbase/lib/$ scp /opt/module/hbase/lib/ct_consumer-1.0-SNAPSHOT.jar hadoop104:/opt/module/hbase/lib/
重新修改hbase-site.xml:
<property><name>hbase.coprocessor.region.classes</name><value>com.china.hbase.CalleeWriteObserver</value></property>
修改后群发:
$ scp -r /opt/module/hbase/conf hadoop103:/opt/module/hbase/$ scp -r /opt/module/hbase/conf hadoop104:/opt/module/hbase/
完成以上步骤后,重新消费数据进行测试。
3.2.7、编写测试单元:范围查找数据
思路:
a) 已知要查询的手机号码以及起始时间节点和结束时间节点,查询该节点范围内的该手机号码的通话记录。
b) 拼装 startRowKey 和 stopRowKey,即扫描范围,要想拼接出扫描范围,首先需要了解 rowkey 组成结构,我们再来复习一下,举个大栗子:
rowkey:分区号_手机号码1_通话建立时间_手机号码2_主(被)叫标记_通话持续时间01_15837312345_20170527081033__1_0180
c) 比如按月查询通话记录,则startRowKey举例:
regionCode_158373123456_201705010stopRowKey举例:
regionCode_158373123456_201706010如下图所示:
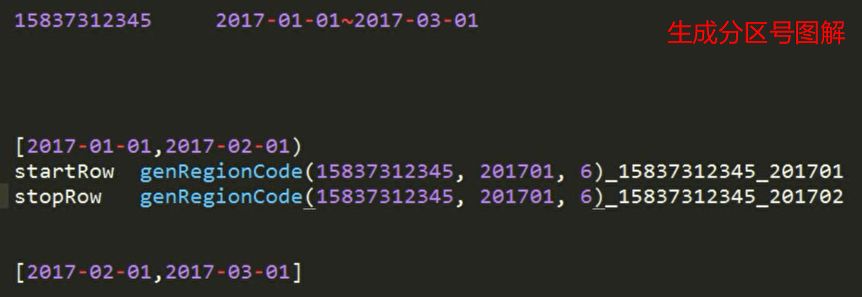
注意:startRowKey 和 stopRowKey 设计时,后面的部分已经被去掉。
尖叫提示:rowKey 的扫描范围为前闭后开。
尖叫提示:rowKey 默认是有序的,排序规则为字符的按位比较。
d) 如果查找所有的,需要多次 scan 表,每次 scan 设置为下一个时间窗口即可,该操作可放置于 for 循环中。
编码:
1) 新建工具类:ScanRowkeyUtil
该类主要用于根据传入指定的查询时间,生成若干组 startRowKey 和 stopRowKey
2) 新建测试单元类 :HBaseScanTest2
3) 运行测试
观察是否已经按照时间范围查询出对应的数据。
开启集群顺序:
1、开启 HDFS、Zookeeper 集群
2、开启 Kafka 集群
3、开启 Flume
4、开启 HBase 集群
5、开启数据生产
6、开启 HBase 数据消费
在开启数据生产,执行 HBase 数据消费代码之前,我们先手动删除 hbase 上的表 和 命名空间,命令如下:
disable 'ns_ct:calllog'drop 'ns_ct:calllog'drop_namespace 'ns_ct'
本文作者为黑泽明军,文章来源于他的个人博客。
文章里有大量的代码示例,为了能够发布我们略去了部分代码。
如你想做深一步的研究,我们建议您点击左下角“阅读原文”到他的博客查看完整代码。