使用 TensorFlow Lite 简化移动端目标检测


发布人:技术推广工程师 Khanh LeViet,代表 TensorFlow Lite 团队
在今年的 Google I/O 大会上,我们很高兴地宣布推出了多项产品更新。这些更新可以帮助简化移动设备上,目标检测模型的训练和部署的过程:
设备端 ML 学习路径:关于如何在移动设备上,训练和部署自定义目标检测模型的分步教程,无需机器学习专业知识。
设备端 ML 学习路径
https://developers.google.com/learn/pathways/going-further-object-detection
EfficientDet-Lite:针对移动设备优化的精尖目标检测模型架构。
EfficientDet-Lite
https://hub.tensorflow.google.cn/s?deployment-format=lite&q=efficientdet-lite
用于目标检测的 TensorFlow Lite Model Maker:只需几行代码即可训练自定义模型
目标检测
http://tensorflow.google.cn/lite/tutorials/model_maker_object_detection
TensorFlow Lite Metadata Writer API:简化元数据创建以生成与 TFLite Task Library 兼容的自定义目标检测模型。
Metadata Writer API
http://tensorflow.google.cn/lite/convert/metadata_writer_tutorial
TFLite Task Library
http://tensorflow.google.cn/lite/inference_with_metadata/task_library/object_detector
尽管目标检测是非常常见的 ML 用例,但可能也是最难执行的用例之一。我们一直致力于为您简化相关操作。在这篇文章中,我们将向您介绍如何利用 TensorFlow Lite 的最新产品、通过使用您自己的训练数据构建最先进的移动端目标检测。


有了 TensorFlow Lite,训练自定义目标检测模型并将其部署到 Android 应用变得非常容易。我们已经发布了学习路径,可指导您按步骤顺利完成相关操作。
您可以通过视频了解构建自定义目标检测器的具体步骤:
1. 准备训练数据。
2. 使用 TensorFlow Lite Model Maker 训练自定义目标检测模型。
3. 使用 TensorFlow Lite Task Library 在您的移动应用上部署模型。
我们还在 GitHub 上提供了带有源代码的 Codelab,供您自行试运行代码。请尝试一下,并告诉我们您的反馈!
Codelab
https://codelabs.developers.google.com/tflite-object-detection-android
告诉我们
https://github.com/googlecodelabs/odml-pathways/issues
在移动设备上运行机器学习模型意味着我们始终需要在模型精度、推理速度和模型大小之间进行权衡。最优的移动端模型不仅需要更加精准,还需要更快地运行速度和更小的体积。我们采用了 EfficientDet 论文中发布的神经架构搜索技术,并优化了在移动设备上运行的模型架构,最终推出了名为 EfficientDet-Lite 的新型移动设备目标检测模型系列。
EfficientDet
https://arxiv.org/abs/1911.09070
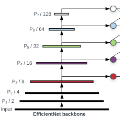
EfficientDet-Lite 有 5 个不同的版本:从 Lite0 到 Lite4。较小的版本运行速度更快,而较大的版本精度更高。您可以先用多个版本的 EfficientNet-Lite 进行试验,然后选择最适合您用例的版本。
|
模型架构 |
大小 (MB)* |
延迟时间 (毫秒)** |
平均精度*** |
|
EfficientDet-Lite0 |
4.4 |
37 |
25.69% |
|
EfficientDet-Lite1 |
5.8 |
49 |
30.55% |
|
EfficientDet-Lite2 |
7.2 |
69 |
33.97% |
|
EfficientDet-Lite3 |
11.4 |
116 |
37.70% |
|
EfficientDet-Lite4 |
19.9 |
260 |
41.96% |
|
SSD MobileNetV2 320x320 |
6.7 |
24 |
20.2% |
|
SSD MobileNetV2 FPNLite 640x640 |
4.3 |
191 |
28.2% |
* 整型量化模型的大小
** 在 Pixel 4 上使用 4 个 CPU 线程测量得出的延迟时间
*** 平均精度是 COCO 2017 验证数据集上的 mAP(平均精度均值)
我们已将在 COCO 数据集上训练的 EfficientDet-Lite 模型发布到 TensorFlow Hub。您还可以使用自己的训练数据,通过 TensorFlow Lite Model Maker 训练 EfficientDet-Lite 自定义模型。
TensorFlow Hub
https://hub.tensorflow.google.cn/s?q=efficientdet/lite
TensorFlow Lite Model Maker 是 Python 库,可显著简化使用自定义数据集训练机器学习模型的过程。该库利用迁移学习,仅使用少量图像即可训练高质量模型。
TensorFlow Lite Model Maker
http://tensorflow.google.cn/lite/guide/model_maker
Model Maker 接受 PASCAL VOC 格式和 Cloud AutoML 的 CSV 格式的数据集。和使用 LabelImg 或 makesense.ai 等开源 GUI 工具创建自己的数据集一样,每位开发者都可以创建用于 Model Maker 的训练数据,且无需编写任何代码。
CSV
https://cloud.google.com/vision/automl/object-detection/docs/csv-format
LabelImg
https://github.com/tzutalin/labelImg
makesense.ai
https://github.com/SkalskiP/make-sense
获得训练数据后,您就可以开始训练自定义的 TensorFlow Lite 目标检测模型了。
# Step 1: Choose the model architecture
spec = model_spec.get('efficientdet_lite2')

# Step 2: Load your training data
train_data, validation_data, test_data = object_detector.DataLoader.from_csv('gs://cloud-ml-data/img/openimage/csv/salads_ml_use.csv')

# Step 3: Train a custom object detector
model = object_detector.create(train_data, model_spec=spec, validation_data=validation_data)

# Step 4: Export the model in the TensorFlow Lite format
model.export(export_dir='.')

# Step 5: Evaluate the TensorFlow Lite model
model.evaluate_tflite('model.tflite', test_data)
查看此 Codelab 了解详情。
Codelab
http://tensorflow.google.cn/lite/tutorials/model_maker_object_detection
TensorFlow Lite Task Library 是跨平台库,它简化了 TensorFlow Lite 模型在移动设备上的部署。使用 TensorFlow Lite Model Maker 训练的自定义目标检测模型只需使用几行 Kotlin 代码即可部署到 Android 应用:
// Step 1: Load the TensorFlow Lite model
val detector = ObjectDetector.createFromFile(context, "model.tflite")

// Step 2: Convert the input Bitmap into a TensorFlow Lite's TensorImage object
val image = TensorImage.fromBitmap(bitmap)

// Step 3: Feed given image to the model and get the detection result
val results = detector.detect(image)
您可参阅一下文档,了解有关 Task Library 中,包括如何配置最小检测阈值或最大检测对象数量等更多自定义选项信息。
文档
https://tensorflow.google.cn/lite/inference_with_metadata/task_library/object_detector
Task Library 依赖 TensorFlow Lite 模型中捆绑的模型元数据来执行必要的预处理和后处理逻辑,以便使用该模型来运行推理。这其中包括如何将输入图像归一化,或如何将类 ID 映射到可人工读取的标签。因为使用 Model Maker 训练的模型会默认包含此类元数据,所以它能够与 Task Library 兼容。但是,如果您使用除 Model Maker 以外的训练流水线,来训练 TensorFlow Lite 目标检测,则可以使用 TensorFlow Lite Metadata Writer API 来添加元数据。
模型元数据
https://tensorflow.google.cn/lite/convert/metadata
例如,如果您使用 TensorFlow Object Detection API 来训练模型,则可以使用以下 Python 代码将元数据添加到 TensorFlow Lite 模型:
LABEL_PATH = 'label_map.txt'
MODEL_PATH = "ssd_mobilenet_v2_fpnlite_640x640_coco17_tpu-8/model.tflite"
SAVE_TO_PATH = "ssd_mobilenet_v2_fpnlite_640x640_coco17_tpu-8/model_with_metadata.tflite"

# Step 1: Specify the preprocessing parameters and label file
writer = object_detector.MetadataWriter.create_for_inference(
    writer_utils.load_file(MODEL_PATH), input_norm_mean=[0],
    input_norm_std=[255], label_file_paths=[LABEL_PATH])

# Step 2: Export the model with metadata
writer_utils.save_file(writer.populate(), SAVE_TO_PATH)
在示例中,我们指定归一化参数 (input_norm_mean=[0], input_norm_std=[255]) ,以便将输入图像归一化到 [0..1] 范围内。您需要指定与模型训练期间使用的预处理逻辑中相同的归一化参数。
归一化
http://tensorflow.google.cn/lite/convert/metadata#normalization_and_quantization_parameters
参阅此 Colab,获取有关如何将使用 TensorFlow Object Detection API 训练的模型转换为 TensorFlow Lite 模型并添加元数据的完整教程。
Colab
https://colab.research.google.com/github/tensorflow/models/blob/master/research/object_detection/colab_tutorials/convert_odt_model_to_TFLite.ipynb

我们的目标是让每位开发者(无论是否具备机器学习专业知识)都能更轻松使用机器学习。目前,我们正在与 TF Model Garden 团队合作,希望推出更多适用于 Model Maker 的目标检测模型架构。未来,我们还将继续与 Google 研究人员合作,通过 Model Maker 提供更多面向未来的更优秀的目标检测模型,缩短从前沿研究到投入实际应用并且供所有开发者使用的整个流程。敬请关注更多动态!

推荐阅读


点击“阅读原文”访问 TensorFlow 官网
不要忘记“一键三连”哦~

分享

点赞

在看